
The Creality CR-6 SE is a fantastic printer, but it can still be better. Here are ten CR-6 SE upgrades and modifications to think about!
If you own or consider purchasing a consumer 3D printer, you’ve most likely come across the Creality brand. Creality is a leading manufacturer of low-cost consumer 3D printers, such as the well-known Ender 3.
Upgrades & Mods For The CR-6 SE
Filament Guide with Window
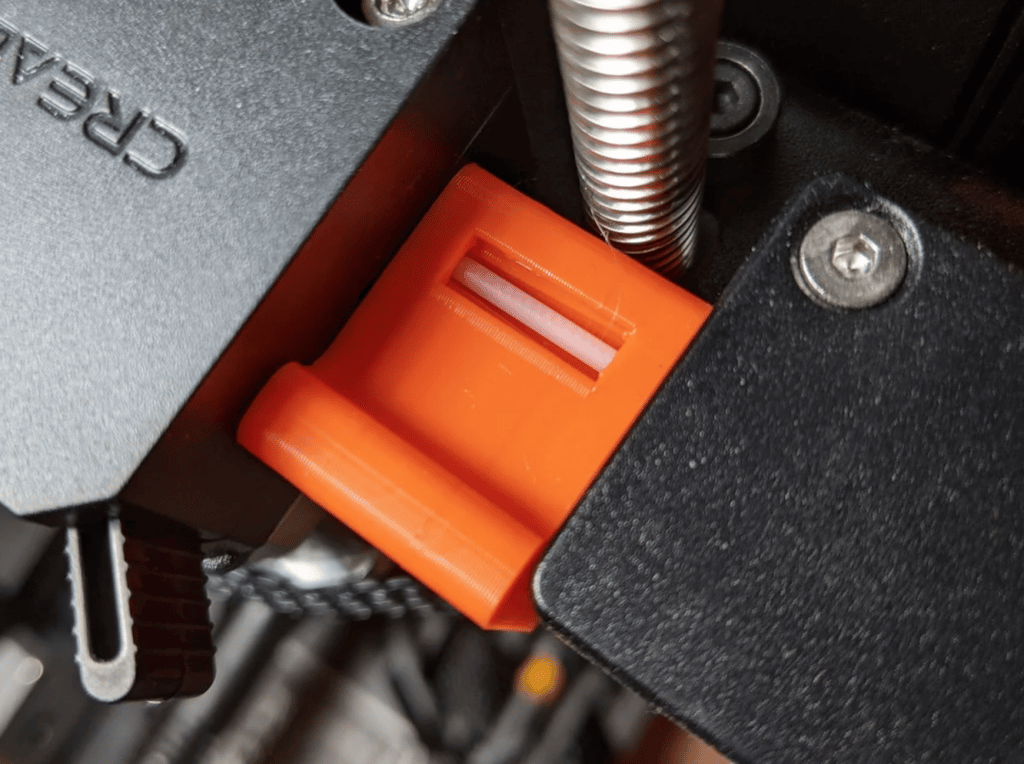
This filament guide bridges the gap between the filament sensor and the extruder, making it easier to load filament. It can be difficult to get the filament through the gap without this guide, especially if you have wider fingers.
- What it does: It makes it easier to load filament and keeps it on the right track
- Parts needed: 3D printed parts
- Approximate cost: less than $1
- Where to get it: alienboytw via Thingiverse
Upgrades & Mods For The CR-6 SE
Bed Handle
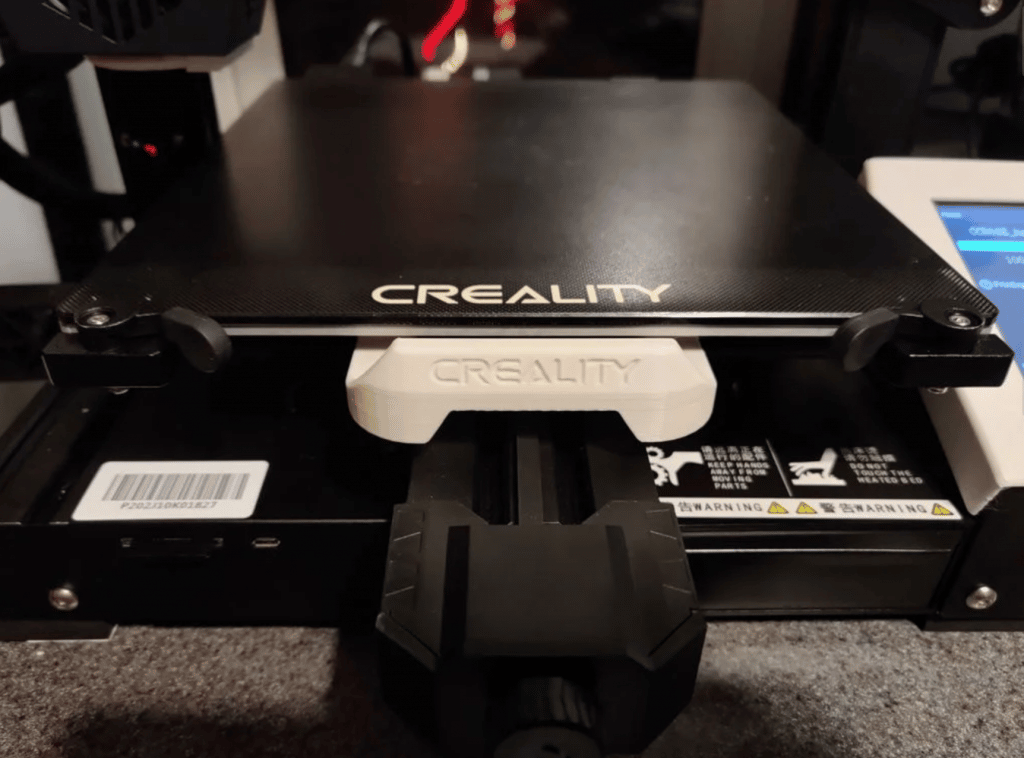
It snaps onto the standoffs underneath the build plate. You can see the two it snaps to in the picture with the red arrows.
- What it does: It makes it easier to load filament and keeps it on the right track
- Parts needed: 3D printed parts
- Approximate cost: less than $1
- Where to get it: Miller_Maker via Thingiverse
Upgrades & Mods For The CR-6 SE
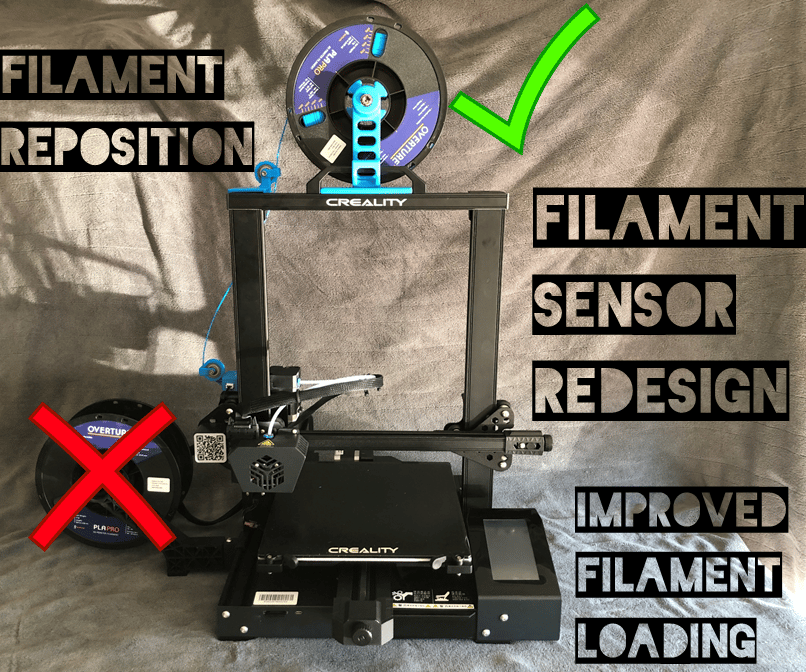
Sensor Housing & Filament Guide
Creality unveiled its first Kickstarter crowdfunding campaign in the summer of 2020 to raise funds and awareness for the Creality CR-6 SE. The CR-6 SE is a powerful printer that includes auto bed leveling (ABL), a glass build panel, belt tensioners, dual Z-axis motors. Also, It has a printhead LED, a quick-action extruder, a silent mainboard, a filament runout sensor, and other features.
You’d think that the maker community would be pleased with the CR-6 SE’s new features. But instead, users continued to look for ways to develop the printer even further. In this post, we’ll go through a few excellent mods and improvements you can make to your CR-6 SE. Since many of the upgrades include a mixture of 3D printed and store-bought pieces, we’ll walk you through how to make each one a reality.
The CR-6 SE has many cool features, but Icelandic from Instructables discovered a few flaws. The filament runout sensor’s filament guides are made of metal. They have sharp edges that can wear or damage the filament as it passes from the spool holder to the extruder. A few assemblies in this project include redesigning the filament runout sensor housing to avoid this problem.
A spool holder and a bearing filament guide are also included, which mount to the top of the CR-6 SE. Also, you can easily make 3D printed parts and other hardware.
According to the designer of this upgrade, the printer’s unnecessarily wide footprint is reduced by moving the side filament spool holder to the top of the frame. The gap between the filament runout sensor and the extruder, which makes loading filament into the latter complex. This project’s assemblies are all designed to match or install perfectly on the CR-6 SE.
On the Instructable project page, you’ll find all the 3D models needed to make the three pieces and the hardware you’ll need. You can use the Allen keys with the CR-6 SE, a few skateboard bearings (608Z), a 5-mm LED, and a few screws. The creator also had well-illustrated instructions for putting the parts together.
- What it does: It makes loading filament easier and keeps filament on the correct path.
- Parts needed: Bearings, LED, screws, 3D printed parts
- Approximate cost: $5-$10
- Where to get it: Icelandic via Instructables
Upgrades & Mods For The CR-6 SE
Dual-Drive Metal Extruder
Dual-drive extruders are a form of the extruder that has two drive gears instead of one. Like the one on the CR-6 SE, many extruders are single drive, which means they have a toothed drive gear connected to the stepper motor axle of the extruder. Extruders with single-drive gears use an idler bearing on the opposite side of the filament direction. In contrast, dual-drive gears use a second drive gear.
Dual-drive extruders hug the filament on both sides, supplying the filament with more driving power than a single-drive extruder. This extruder is ideal for 3D printing flexible filaments and is an excellent upgrade for the CR-6 SE. To mount it, remove the old extruder with the Allen keys and replace it with the dual-drive extruder.
What it does: Increases the moving power of filaments, making it easier to print flexible filaments.
- What it does: Provides better pushing force for filaments, makes printing flexible filaments easier.
- Parts needed: Dual-drive extruder
- Approximate cost: $20
- Where to get it: Amazon
Upgrades & Mods For The CR-6 SE
Creality Wi-Fi Box
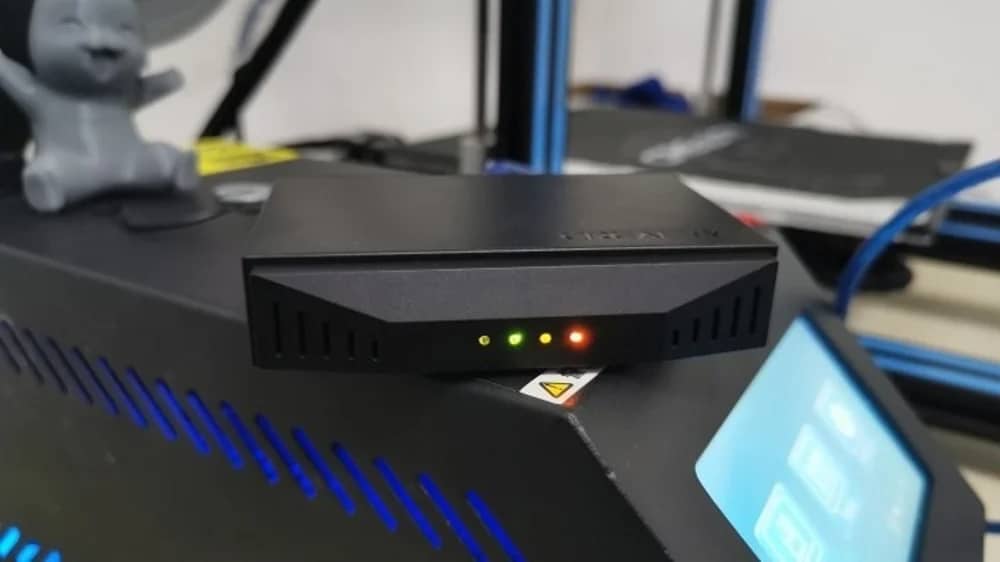
The Creality Wi-Fi Box is Creality’s own remote control platform for their 3D printers. It can be a remarkable modification for the CR-6 SE when combined with the accompanying app and a camera (if you want to install one). You’ll be able to remotely track your 3D printer, start prints, adjust temperatures, and more with the Creality Wi-Fi Box.
In addition to these features, the Creality Cloud app allows you to search for and slice designs. As long as you use the stock mainboard, the CR-6 SE is one of the printers provided by the Creality Wi-Fi Box and the Creality app. Creality has also included installation guides, so it shouldn’t be too difficult to set up.
- What it does: You can print and control your machine remotely and monitor your machine using their app.
- Parts needed: Creality Wi-Fi Box
- Approximate cost: $20
- Where to get it: Amazon or Creality
Upgrades & Mods For The CR-6 SE
Cable Organizers
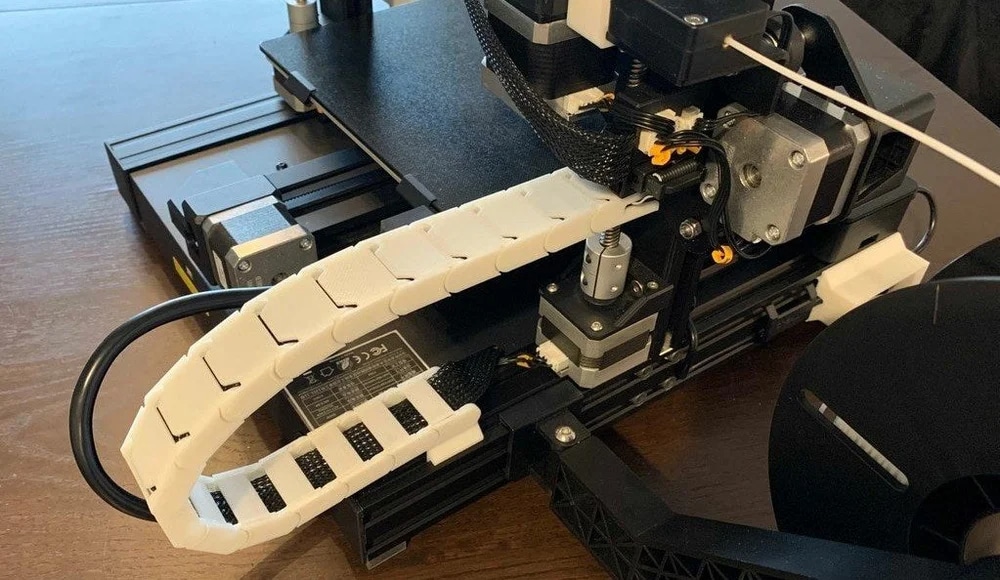
Cable management and wire organization are common issues with DIY machines like the CR-6 SE. It’s important to keep wires clean and out of the way when working with moving parts! The printhead on the CR-6 SE is driven by a ribbon cable that connects it to the mainboard. And it mustn’t get stuck on anything, particularly your prints.
The ribbon cable is held up and out of the way by an attachable 3D printed support attached to the printhead. The design also includes a feature that secures the PTFE tunnel. The designer also points out that since the print will not expand the printhead’s field, no X-axis changes are required to install this modification.
Cable chains are used for cable management. Cable chains are easily modulable because they can be added and removed when needed; they also secure and contain the wires inside them, preventing them from being disrupted by external forces (like the hot end). Cable chains are relatively simple to print, and the designer stated that they used a 20% infill density with supports enabled on the “EndLink” part to do so.
- What it does: Keeps wires and cables out of the printer and protects both the printer and the wires.
- Parts needed: 3D printed parts
- Approximate cost: $1-$3
- Where to get it:
- Support: kevfquinn via Cults
- Chains: Riddeen via Thingiverse
Upgrades & Mods For The CR-6 SE
Light Bar
Lights on a computer can go unnoticed, but they’re crucial for 3D printers, where you’re constantly looking at the print bed to ensure the first layer goes down smoothly. Creality was aware of the issue and added a small LED light to the printhead aimed at the nozzle. This function is useful for looking directly at the nozzle, but it doesn’t have much illumination beyond that.
Although Creality’s built-in light is a good start, a light bar will let you see more of your CR-6 SE. The project linked below includes a simple mounting plate. You can easily mount a light bar using common adhesives (or many light bars include an adhesive pad on the back of them).
- What it does: Lights up your build space.
- Parts needed: Small cabinet light bar, 3D printed parts
- Approximate cost: $15-$30
- Where to get it: PandaTaco via Thingiverse
Upgrades & Mods For The CR-6 SE
Prevent Vibrations
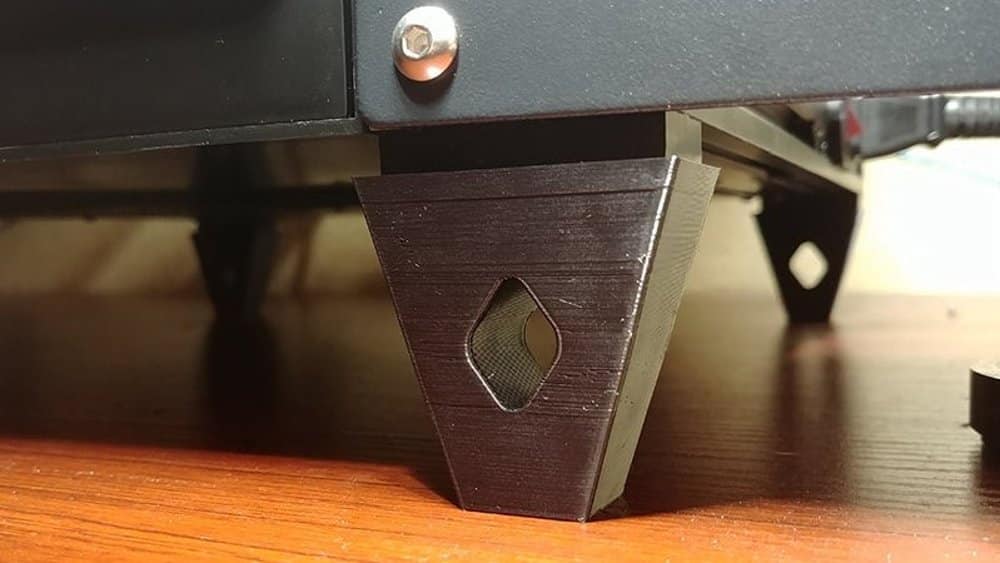
The TMC2209 stepper motor drivers on the CR-6 SE significantly reduce the noise produced by your printer’s motors. Although the printer isn’t particularly noisy, the quieter it is, the better! You mount these vibration-damping feet under your printer and reduce noise by absorbing the printer’s vibrations, making it a win-win situation for both your ears and your prints.
The designer recommended a 10% infill density with no support structures activated and a 10% infill density with no support structures activated for this model. Also, the designer mentioned that you can print in TPU. Although a flexible filament’s pliability is optimal, any impact-resistant material such as ABS or nylon should have a similar effect.
- What it does: Silences your printer, prevents vibrations from disrupting prints.
- Parts needed: 3D printed parts
- Approximate cost: $1-$2
- Where to get it: 3Deth via Thingiverse
Upgrades & Mods For The CR-6 SE
PEI Steel Build Plate
The construct plate is the printing surface, which is normally made of a material that allows for good first layer adhesion (e.g., glass, PEI sheet, etc.). Since prints are less likely to warp, dislodge, or curl up with a good build plate, it can make a major difference (unless other factors are in play).
The CR-6 SE comes with a tempered glass build cover, which is a great feature since printed parts stick to the bed when it’s hot but release quickly when it’s cold. You can upgrade other Creality printers, such as the original Ender 3 and CR-10 to have tempered glass beds. But the CR-6 SE comes with one right out of the box.
Alternatively, other build plate styles and materials, such as the famous PEI spring steel option found on the Prusa i3 MK3S+, provide different benefits over a glass bed. This is another possible improvement for the CR-6 SE, as it retains its excellent adhesion properties while still being flexible and magnetic. The PEI in the name of this build plate stands for polyetherimide, a low-maintenance material. Additionally, this bed surface material is compatible with a variety of 3D printing filament materials.
There are two surface choices for these build plates: textured and smooth. In general, the textured alternative has better adhesion but leaves a rougher texture on the first layer of prints, requiring more post-processing; textured options often release prints quickly once the plate cools. On the other hand, Smooth surfaces make component removal a little more difficult but leave an ultra-smooth finish at the bottom of your print.
Remove your current glass bed and bed clamps (if they get in the way), add the magnetic sticker, and then position the new build plate over it to connect this build plate to your CR-6 SE. Ensure the perfect finish (smooth or textured) is facing up when you position the build plate. Finally, note that you can always remove the build plate and bend it to release a stubborn print that won’t release with only cooling.
- What it does: Provides great first layer adhesion, makes part removal easier.
- Parts needed: Spring steel build plate
- Approximate cost: $25 – $35
Upgrades & Mods For The CR-6 SE
Direct Drive Extruder
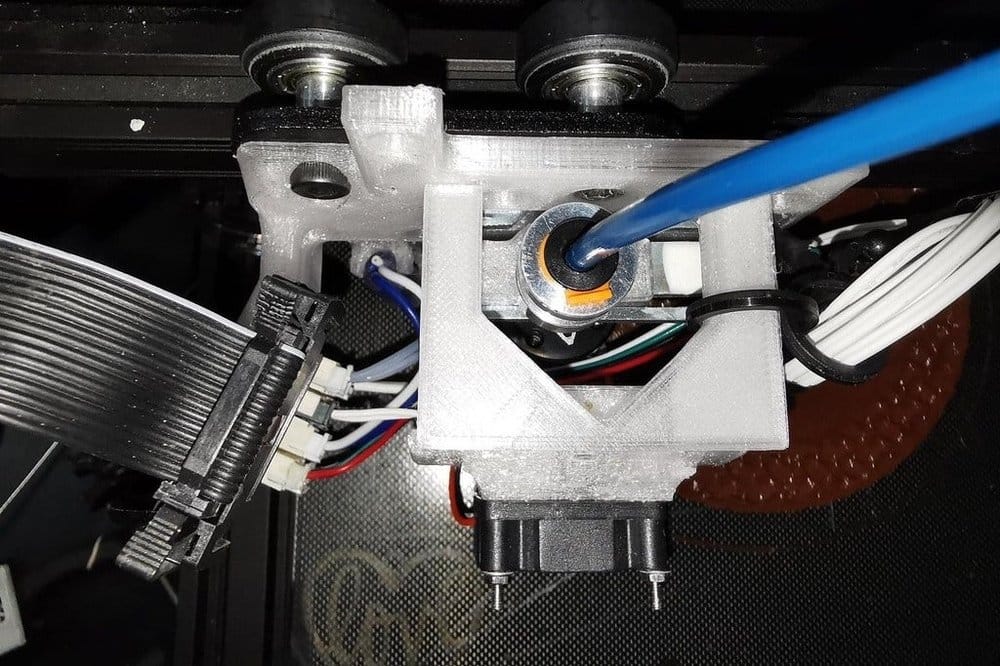
The extruder’s setup and position to the printer’s hot end are essential. The extruder is mounted separately from the hot end on a stock CR-6 SE. And the filament passes through a Bowden (PTFE) tube. On the other hand, a direct drive system positions the extruder directly above the hot end, eliminating the need for a long Bowden tube.
Direct drive extruders, like dual-drive extruders, are excellent for printing flexible filaments but can be difficult to unclog. A 3D printable mount for converting your CR-6 SE to a direct drive setup is available at the connection below. A fan duct for a part-cooling fan, filament runout sensor, and other features are included in the project.
This upgrade necessitates a considerable amount of hardware, including a 5015 blower fan, screws, and other objects. The designer recommends using a 25-mm pancake stepper motor instead of the stock extruder motor; however, one registered Maker reported that they could use the original with some minor modifications, which you can read about in the description.
Since the stock wires may not operate when the extruder is moved. You may need to solder a few wires to extend them. As long as you have the correct equipment and follow directions, you should complete this upgrade.
- What it does: Places the extruder directly over the hot end to make printing flexibles easier and reduce retraction.
- Parts needed: Radial fan, pancake stepper motor, 3D printed parts, screws
- Approximate cost: $25-$30
What is your best upgrade or mod for the CR-6 SE?
Let us know in the comments below or on our Facebook page to let us know your ideas, and we would appreciate seeing pictures of your works of art!

