
Everyone in the world of 3D printing wishes they could nail the first layer when starting their print. To get it correctly, though, you must pay close attention to the finer points and be conscious of what needs to be addressed.
This essay will help you achieve that goal by assisting you in polishing the first layer.
The most significant factors are undoubtedly optimizing the print settings, cleaning the print surface, and being aware of your filament type.
Higher print and bed temperatures, a slightly increased initial layer height and width, a slower print speed, and an evenly leveled print surface are all examples. Additionally, using support items is something to think about.
Why is My First Layer Not Coming Out Perfect?
Several factors will determine whether or not your first layer will be successful. The truth is that you must keep an eye out for each of them in some way to ensure that your print’s foundation is not jeopardized.
Before delving into the specific techniques and methods for achieving that perfect first layer, it’s critical to understand what factors influence a good or bad first layer to address the issues.
Without further troubles, let’s get to the bottom of why your first layer isn’t coming out perfectly.
Incorrect Temperature Settings
There’s no doubt that temperature has a vital role in 3D printing. It’s to be observed through-and-through, being the foundational factor that it is.
What’s even more complicated is that there are various filaments you can print with. Each one has its own set range of ideal temperatures. Apart from that, the temperature of the nozzle also has to be calibrated aptly.
Many people sacrifice a perfect first layer by not taking the necessary steps to account for proper temperature, so they aren’t using the best temperature settings.
Not only printing temperature at the nozzle, but we also have to consider the temperature of the print bed, which can require adjustments to get the first layer right.
Bad Printing Speed
Another component of an unsightly first layer is speed, which is definitely important enough to pay close attention to. Even if every other factor is perfect, a slow printing speed can quickly wreak havoc on your first layers.
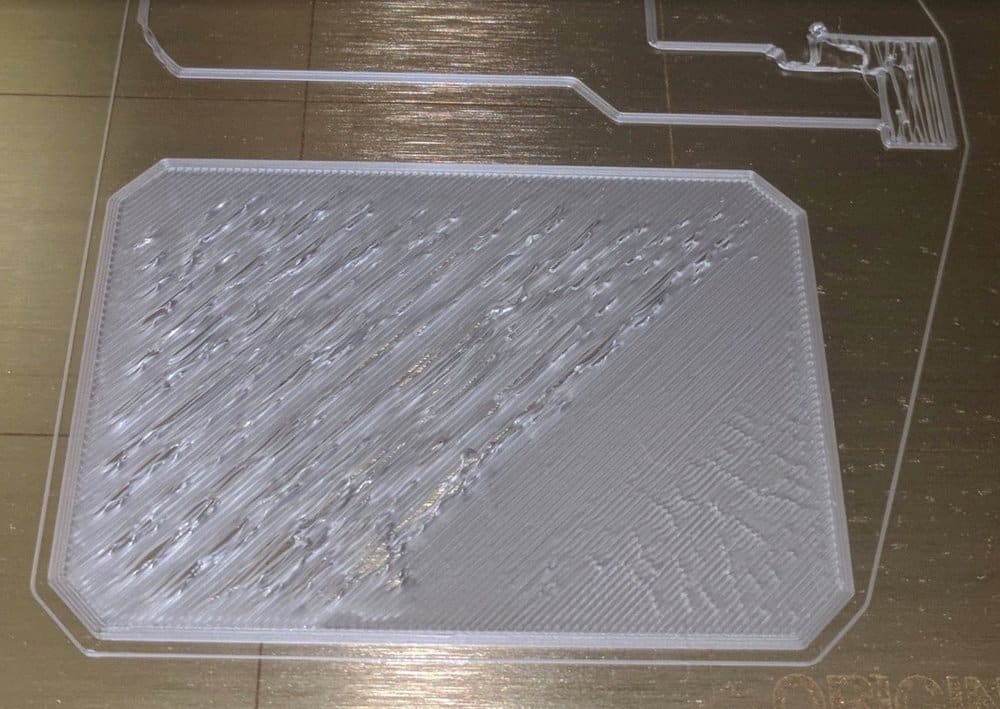
The Nozzle is Too Close to the Bed

This is a widespread problem that affects a large number of people. But don’t worry, there’s a simple solution to this problem that we’ll discuss later.
First, let’s talk about how to tell if the problem you’re having is this one or something else.
Fortunately, there are some undeniable signs that your nozzle is printing too close to the bed. Typically, the first one is when you can see transparent initial outlines on the print bed.
This is followed by a visible squishing of filament during the infill process.
Following that, you’ll notice that your thermoplastic is becoming more prone to tearing. As a result, print removal becomes extremely difficult.
Aside from that, there will be a clicking sound coming from the extruder motor. This indicates insufficient space between the printing bed and the nozzle for the filament to be extruded appropriately.
Incorrect Z-Height Calibration

The Z-height calibration goes a long way toward ensuring the success of your print. However, if the optimization is not performed correctly, it can result in a poorly extruded first layer.
The first case occurs when the first layer is too thick to properly adhere to the bed. Most of the time, it will detach from the print bed at some point, resulting in a failed print and a lot of wasted filament.
On the other hand, when the first player is printed extremely low, the printer’s hot end is forced to drag over the previous layers.
This gives your model a very unprofessional and unappealing appearance while significantly increasing the chances of a clogged nozzle. Furthermore, the layers will appear crushed as you print them.
When the Z-height is not properly honed, the filament extrudes out the sides of the nozzle.
Uneven Print Bed
There’s a good chance your first layer isn’t sticking correctly because your print surface is uneven. As a result, the print is satisfactory in some places but distorted and deformed in others.
As a result, the surface must be kept flat to achieve the desired quality of your first layer.
Keep in mind that even minor variations such as 0.1 mm, which is equivalent to hair thickness, matter when it comes to a leveled bed. This highlights the significance of maintaining an even bed if you want a great first layer.
Unclean Print Surface
Another reason you’re not getting the results you want is a lack of cleanliness on your print bed. This is common, as the build platform is prone to catching dirt, grease, filament leftovers, and other debris in the aftermath of printing.
Even if you have perfect print settings, a level bed, and layer height calibration, your first layer may not adhere to the print bed due to surface impurities.
Dirty marks such as finger grease, dust, tool residue, and other smudges can accumulate on the print bed in various ways, such as during print removal or an accidental nudge here and there.
A Clogged Extruder or Nozzle
A partial or complete blockage in your extruder nozzle is another supporter of a bad first layer. Clogging occurs for various reasons, one of which is excessive dirt and debris becoming stuck inside the extruder.
Then there’s the possibility of red-hot thermoplastic trapped inside the nozzle for too long, resulting in a clogged condition.
Furthermore, the filament may cool and soften in places where it is not supposed to, such as inside the extruder, resulting in an unwelcome blockage. You should also keep a close eye on the nozzle tip to see if any filament residue is protruding out the sides.
If you want to go large in 3D printing and acquire these two elegant features, you’ll need to invest some time and work in both.
This is why we’ll take you through the process step by step to provide you with the best possible education.
Now that you know what causes a destroyed initial layer let’s move on to the portion where we’ll figure out how to fix it.
Printing Bed Leveling
- Get a BLTouch automated bed-leveling system.
- Before you start printing, check sure your bed is leveled correctly with a test print.
The first step in getting a perfect first layer is to level your print bed and ensure that it is leveled equally across the entire area, not just on the corners.
Check the middle of the print bed is leveled, and there is a little space between the nozzle and the build surface when you place a piece of paper underneath.
The widely desired feature of automatic bed leveling is now included in most newer-style 3D printers.
You can enhance your skills to get an excellent level bed without using an automatic method if you still employ manual bed leveling. It takes some getting accustomed to, but with experience, it becomes much more manageable.
When it comes to getting that perfect initial layer, a suitably flat print bed comes in handy. The essential aspect of resolving this issue is precision and accuracy, so automated bed levelers like the BLTouch perform well.
One of the most important things to look for before you start printing is a perfectly leveled, flat-surfaced bed. An adequately leveled bed lays the path for a magnificent print once you get through the first layer.
To begin, pre-heat the bed and nozzle temperature of your 3D printer. This is recommended because when a cold print bed is heated, it can quickly shift levels and warp.
Next, you should know that today’s FDM 3D printers include at least three or four screws that can be adjusted to level the bed, mainly in the corners.
The trick is to calibrate the bed, evenly balanced in all four corners and in the middle. Slide a post-it note or any other index card under the nozzle’s tip and just above the print bed to accomplish this.
You’re good to go if you feel a smidgeon of resistance when dragging the card back and forth. If this isn’t the case, tighten the screw till it is. To level the bed properly, repeat the operation in all four corners.
The need for manual bed leveling is underscored because it is also advised in printers equipped with automatic bed-leveling wizards. This is merely to improve the first layer’s dependability and efficiency, and so on.
Here’s a link to my post on How to Level Your 3D Printer Bed & Nozzle Height Calibration, which goes over the entire procedure in depth.
While a test print is running, leveling is sometimes a promising approach for getting good leveling, which I’ve seen referred to as “live-leveling.”
Flat Print Surface
As previously said, your bed may level out neatly on each corner and even in the middle; however, uneven surfaces may exist around your build surface.
When you use specific bed materials that are prone to warping, this happens.
- A glass construction plate is ideal for keeping things flat over time.

Cleaning the Nozzle and Print Surface
- Isopropyl alcohol should be used to clean your print surface properly.
- To eliminate any clogs in your nozzle, use cold pull.
- Dislodge jams in your nozzle with a cleaning needle.
As previously said, tweaking your printer’s settings is pointless if the surface you’ll be printing on is dirty with dust and grease and your nozzle is clogged.
As a result, before you begin, take a close look at the build platform and the extruder and remove anything repellent.
What you could do better is make it a practice to wipe down your print surface regularly. Keep a clean, dry cloth near your printer at all times, and mop the platform regularly to remove dust.
In addition, using Isopropyl Alcohol with a paper towel or any other cloth is a proven method of cleaning the surface.
As a result, whatever debris, oil, dust, filament residue, or anything else that isn’t in line with an ideal print bed is entirely removed from your platform.
According to some experts, lower concentrations of IPA may contain undesired compounds and oils that may obstruct your quest for spotlessness.
You can even get down to work with disposable print beds in a sink. To give it a good scrub, you can use any ordinary cleaning soap and lukewarm water.
Finally, there’s the unsettling filament mass that refuses to leave the nozzle. If this happens, you’ll notice how tiresome and difficult bed leveling gets, making gap adjustment more difficult.
Fortunately, you can clear the debris surrounding the nozzle’s tip with the bristles of a brass brush.
You can do one more thing: heat the nozzle and wipe away any excess filament. This will ensure that the filament can extrude freely and that there will be no issues with the nozzle.
Use the Proper Build Surface
- Use a good build surface such as BuildTak, PEI, or a magnetic flex build plate
- Make sure your construction surface isn’t damaged.
Many 3D printer customers claim that switching to a specific bed surface improved the quality of their first layers and overall prints.
One of the better build surfaces that work for most is PEI-coated beds. They are more premium than the usual build surfaces out there, but they seem to work a lot better.
It has stopped warping and curling for many 3D printer users. It has allowed for excellent adhesion throughout the whole printing process.
PEI is famous for Prusa 3D printers. The officials themselves have advised using acetone on the print surface after more than a hundred hours of printing.
Side by side, it’s been said that PEI gradually loses its adhesive capabilities and could happily use a rigorous wipe of acetone.
Careful not to mess around with the chemical on the smooth PEI bed before you’ve started printing with PETG.
This is because acetone can easily dissolve the thermoplastic in question and is only recommended after its usage to nudge it off the print surface.
Ensure that the first layer settings are optimal (increase the initial layer line width in the first layer settings).
- Increase the ‘Initial Layer Line Width’ to up to 200 percent of the diameter of your nozzle.
- Set the initial layer height to around 75% of the nozzle diameter.
- Reduce the first layer speed to roughly 50% of the printing speed, or 20mm/s (default in Cura)
- During the first few layers, make sure your cooling fan is turned off.
The next phase emphasizes the importance of more closely tied settings to the core of 3D printing. In combination with speed, the first layer parameters play a critical role in ensuring that the first layer adheres.
If these basic settings are incorrect, you won’t be able to start your prints correctly.
Even if one of the settings isn’t perfect, your first layers may not seem as well as they could. You can use trial and error to see how those steps work out for you, as explained above.
First and foremost, if you have a habit of printing quickly, it’s time to change things up. For example, if your First Layer Speed is set to 100%, start your print at 50%. When it comes to refining that first layer, printing slower is crucial.
Cura’s default First Layer Speed is 20mm/s, ideal for a flawless first layer, so double-check your parameters and make sure it’s in that range.
Then there are the fan speed settings, which you should be aware of. Even though the cooling process while printing is critical for effective prints, you’ll have to turn off the fan for the first few layers.
We recommend shutting it off for the initial layer so that the print settles in beautifully and sticks better to the warm surface. From the second layer onwards, feel free to utilize the fan.
Many customers have found that increasing the ‘Initial Layer Line Width’ parameter helps prop up their initial layer to the point where adhesion increases dramatically.
This also works in conjunction with the first layer height parameter, which may be tweaked to better your first layer.
Implement Skirts, Brims & Rafts
Skirts, brims, and rafts – all support elements in 3D printing – are one way to fine-tune your first layer without adding to the burden. Let us walk you through each of these fantastic features.
Skirts should be produced around the print so that it completely surrounds the model you’re working on. These serve to prepare the nozzle so that it can perform at its finest when it matters most, which is when it’s working on your print.
Minor temporary blockages in your nozzle can be dislodged after some extruding. Therefore it’s best if it happens away from your main print, which the skirt does.
As a result, priming the extruder beforehand increases your chances of achieving a beautiful initial layer.
Brims, which are similar to skirts but actually contact the outside walls of your 3D printing, are next in line. They function by providing a solid foundation for your first layer and 3D print.
They take a little more filament than a skirt, but they work wonders for your first layer.
Finally, but certainly not least, there are rafts. Rafts provide a stable foundation for your model to be printed on. These relieve the pressure of perfect bed-leveling and eliminate any margin for error.
The initial layer clings to the raft better, and you may remove this support item from the print once it’s finished. Keep in mind that printing rafts requires the most extra material and, depending on your settings, may necessitate a lot of work to separate it.
You may fine-tune your raft settings to save filament and make it simple to detach after a print.
Use the Optimal Temperature Settings
- To calibrate temperature settings, use a temperature tower.
For a tremendous initial layer, make sure your temperature settings are accurate. It may take some basic trial and error to get the temperature settings just right, but it will be well worth it for the quality of your 3D printer.
A temperature calibration tower, which you can get on Thingiverse, is ideal for tuning your temperature settings.
The initial step is to experiment with temperatures within the filament manufacturer’s recommended range. This range is commonly printed on the filament container or on the roll of the filament itself.
There are a variety of 3D printing filaments available, each with its own set of characteristics. Not all thermoplastics are created equal, and not all thermoplastics are handled in the same way.
Because of minor manufacturing changes, even filament from the same brand and color can have varying optimum temperatures.
Some filaments, such as ABS and Nylon, may require higher temperatures, while PLA is content with lower temperatures.
Furthermore, due to the varied nature of thermoplastics, PETG and TPE stick so well that print removal almost always necessitates the use of a releasing agent.
Items like glue sticks and hairsprays, on the other hand, can aid in the attachment of irritatingly stiff filaments.
Adjust Techniques Depending on Filament Used
As previously stated, different filaments react to temperature variations and even adhere to construct surfaces in different ways. Certain filaments, including PETG and TPE, are best avoided when printing directly onto the build plate.
They have a tendency to attach to print surfaces a little too well, to the point where they can practically form a permanent bond.
According to one video, the glass bed on the 3D Printing Nerd’s $38,000 3D printer actually cracked due to a PETG 3D print clinging to the bed.
To combat this, use a glue stick, hairspray, or specialist 3D printer adhesives on your print bed to provide an additional surface between the bed and the material.
Use an Adhesive Substance on Your Print Bed
- Many 3D printer users utilize a thin layer of glue stick as a frequent way.
- Hairspray can be used to aid with the adhesion of the initial layer.
- Another option is to use blue painter’s tape on the build surface.
Calibrate Your Extruder
Calibrating your extruder is a step that many 3D printer users overlook. It has a negative impact on your first layers. Make sure your extruder is as accurate as possible. It usually leads to higher first-layer quality and overall print quality.


