Table of Contents
The first layer is crucial and will normally decide whether or not your model will fail later in the construct.
Very many people do not pay enough attention to the nuances to get the proper first layer.
If you’ve done that, many of your issues will vanish, and 3D printing will become more enjoyable and predictable!
THERE ARE SEVEN KEY FACTORS IN CREATING THE PERFECT FIRST LAYER
1. EXPERIENCED MACHINE
This is more about good planning for the rest of the steps than it is about the first layer.
Tramming the unit means ensuring that all of the components are at a perfect 90°** angle to one another; this does not imply leveling with a bubble level gauge. It entails ensuring that your vertical elements are all at 90° to the horizontal elements, that your X gantry is parallel to the bed, and that your Z-axis is at 90° to the bed.
Many people believe that if you have an inclined X and level the bed to it, your problems are solved, but you will be printing all of your vertices on an angle and getting poor geometry models.
Take the time to properly set the rig, loosen screws, keep an exact machinist’s square to the joints, and retighten. In the long term, it would make a difference!
2. CLEAN PRINT SURFACE

You should make a habit of cleaning your print surface regularly, or even every time between prints, because finger grease, dust from the environment, and residual from the tools and filament used can all contaminate the surface and serve as a barrier between adhesion and non-adhesion. I recommend having a roll of paper towel and a squeeze bottle of isopropyl alcohol near your computer and making a clean wipe part of your setup routine.
3. SURFACE FOR FLAT PRINTING
As we can see in the following measures, differences as small as your hair thickness or even 0.1 mm will cause the first layer to be off. If your print bed is warped, you will be able to achieve a decent level at certain stages, but at others, the bed may be too far or too close to the nozzle. The easiest way to check for flatness is to use an accurate steel ruler, place it on edge across the bed, and look down to the height of the floor, then shine a light from the opposite side. A bowed surface is visible as light shines through it. Rep in all directions, including diagonals and X and Y.
If your bed is not smooth, you can carefully shim it under the print surface with thin aluminum strips. Alternatively, find a completely smooth bed material, such as Borosilicate Glass or MIC6 Tool grade aluminum sheet.
4. PERFECTLY LEVELED PRINT SURFACE

Use good leveling software that stops right above each adjustment knob to level your bed.
Always keep the nozzle level and the bed heated to the optimal print temperature.
Take your time changing the heights; never shift more than one knob at a time, as this will cause your bed to bend!
I like to level with heavy stock paper so I can feel the right resistance between the nozzle and the bed, allowing me to push and pull the paper through without it bunching up.
Enable the program to cycle; when you change one knob, it will cause another corner to shift slightly.
Go around the rig several times before you can complete a full rotation around all knobs without touching any of them.
Do a live level after you’ve leveled well. This can be built into the model you’re going to print by making the slicer create a one-layer skirt 2-4 rings as far away from the model as possible while still staying on your build surface. While the printer is printing the skirt layers, keep an eye on it and very slightly change any knobs that are too high or too low. With this tool, you will be able to obtain precisely the right settings.
5. CREATING A GAP
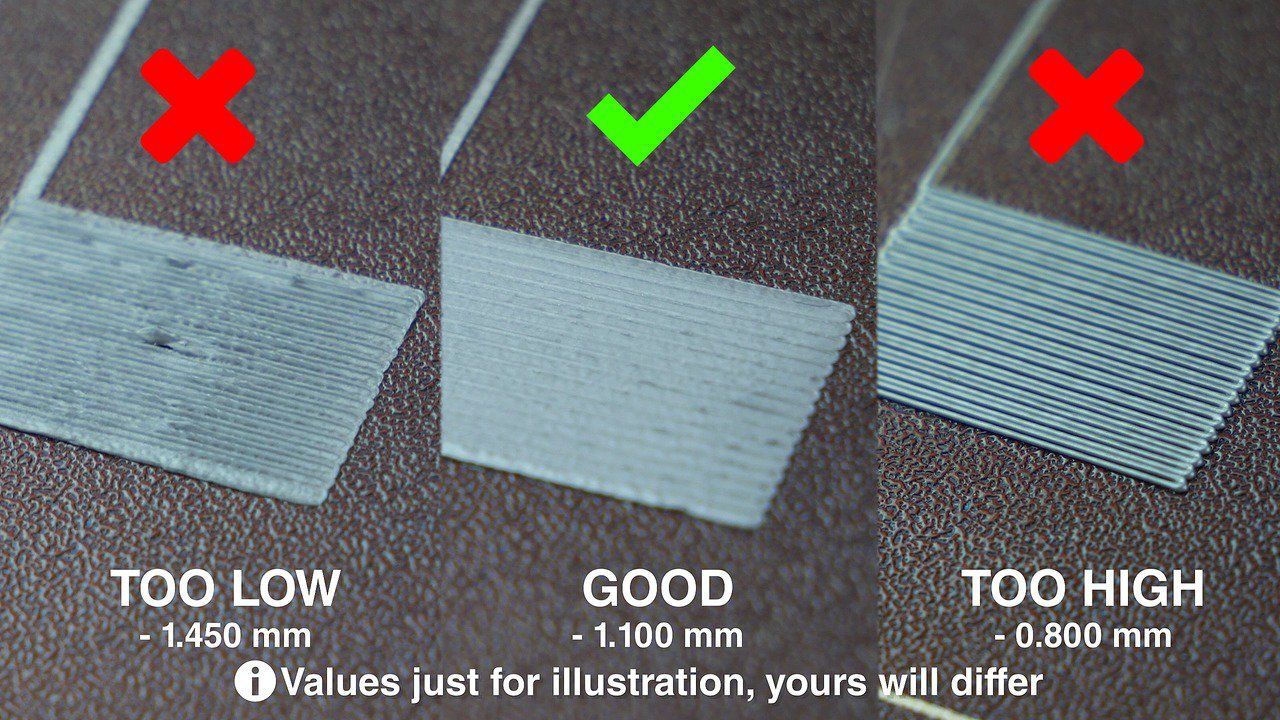
The difference is all until you have a flat and clean print surface and have leveled the printer!
Look at the example. If the distance between the nozzle and the print surface is too large, you are printing in air, which allows the filament to slightly cool before dropping onto the bed, where it may or may not grip. The filament’s cross-section will be ROUND. The filament will most likely not remain where you are printing it, but will instead follow the nozzle around corners and finally bunch up. This is not ideal. For your first layer to adhere well and stay down, squish it against the construct surface. You’ll need to close the gap.
If your filament is being squished until it is paper-thin, to the point that it sometimes does not come out or appears pulled, you are probably too close, so increase your distance (a little at a time). If your printed filament is squished to your print surface in such a way that it is slightly wider than if printed on air, has a flat top, but a constant width, you have most likely found the perfect distance! When your distance is fine, your solid fill areas will be filled, your prints will adhere to the surface, and you will fall in love with 3D printing!
There is no standard calculation for the exact gap; it depends on your filament (for example, PLA can be squished a lot, while PETG does not like the nozzle dragging over it), your print surface content, your nozzle size, your feed rate, and so on. So get in the habit of looking at a live stage, feeling the bed with your finger, and changing on the fly. It becomes really simple after a while.
However, in general, the first layer should be about half the size of your nozzle, so if you’re printing with a 0.40 nozzle, you may want to start with a gap of about 0.20.
6. SELECTING THE RIGHT PRINT SURFACE
There are various choices for high-quality print surfaces. You may use glues, hair spray, or tape to make your filament hold, but I think of these as training wheels; if you follow the right measures, there is no need for these, and getting rid of them can speed up your clean up and preparation period, keep the bottom of your models uncontaminated, and save you money on consumables over time. If you get good results and don’t want to adjust, you should keep using them!
You may print on traditional build surfaces, which are usually made of PC. These provide an excellent stick but be aware that they cannot accept filaments that exceed high temperatures, and even PETG tends to fuse to them a little too well. You may also experiment with PP sheets. You can print directly on very clean glass, but your distance and level must be fine. You can print on Kapton tape or a PEI sheet; this is one of your best choices since it resists heat much better than PC and can thus be used to print PETG, ABS, and other materials. PEI can also be cleaned with alcohol, is resistant to acetone, and can be re-vitalized with steel wool and alcohol.
7. PRINT SPEEDS AND BED TEMPERATURE

Check that your bed has been heated to the recommended temperatures for best attraction, turn off your bed fans for the first few layers so they can fuse down properly, and LOWER your print speeds. If I’m printing at an average of 60mms/second for my main model, I print the first layer at 40% or 25mms/second. This will allow it to lay down properly without being dragged by the print head. This will aid in the grip of thin areas and supports.
What do you think is perfect first layer essential for FDM printing?
Let us know in the comments below or on our Facebook page to let us know your ideas, and we would appreciate seeing pictures of your works of art!


