
Extend your Ender 3’s printing capabilities! Read on to see the best Ender 3 enclosures, whether you build or buy one.
If you haven’t heard of the Creality Ender 3, it’s a popular budget 3D printer with a large community following and a slew of upgrade options. Because of the Ender 3’s popularity, newer models such as the Ender 3 Pro, Ender 3 V2, and Ender 3 S1 have been released. Although the Ender 3s have significant variances, they all have the same proportions.
The Ender 3’s inexpensive cost implies its restricted features in a few areas despite its popularity. An enclosure is one of these areas, which the Ender 3 and many other Creality printers lack. A casing or surrounding structure that inhibits air drafts traps heat to insulate the printer’s environment and can even filter released fumes, referred to as an enclosure.
Although it is possible to print ABS, ASA, or similar filaments without an enclosure, you should have one because it dramatically reduces the risk of cracking, warping, and other heat-related issues with heat-sensitive filaments.
In this article, we’ll look at a few various Ender 3 V2 / PRO enclosures that you may build or purchase. Other aspects, including visibility, accessibility, assembly, and cost, are essential to the insulating properties of enclosures.

Ender 3 V2 Enclosures: 6 Simple Options
Build: Ikea Lack
First, the Ikea Lack enclosure, which includes upcycling an Ikea Lack table, has been a popular design choice for a few years. For Prusa i3 design printers, this sort of enclosure appears to be particularly common.
Whether you utilize one of the numerous available instructions or construct your own, the specifics of this enclosure may vary. However, they all employ an Ikea Lack table (or two), acrylic panels, 3D printed pieces, and other hardware.
Note that while acrylic is an excellent heat insulator on its own. when combined with the table’s wood, the level of insulation is reduced; however, it should be fine for printing ABS.
The acrylic panels usually sit on the table’s sides for four-sided visibility, and you can access your printer through a door or a removable top panel, depending on the project. This enclosure design can be pretty attractive, and if you utilize numerous tables, you’ll have plenty of room to store extra filament, tools, or whatever else you need. Lights, cable passageways, a filament holder, and other accessories are popular additions.
This enclosure should cost roughly $80 on average to assemble all parts. However, if you can find inexpensive acrylic panels, the cost might be as low as $50. Complete kits cost $58; alternatively, you can acquire all items based on a guide.
- Cost: ~$50-$80 (depends on the price of your acrylic panels)
- Visibility: Four sides
- Accessibility: Door or removable panel
- Assembly: Hard

Ender 3 V2 Enclosures: 6 Simple Options
Build: Exercise Mats
Second, if you have any old exercise mats sitting around, you can use them to construct a 3D printer enclosure. For this style of enclosure, all you’ll need are six interlocking workout mats for coverage and insulation. Although this isn’t the most attractive enclosure choice, it is cost-effective and practical.
The majority of exercise mats are comprised of a rubbery material that acts as an excellent insulator. Small cracks and holes in a matted enclosure are likely to let air drafts in, but they should still be able to produce beautiful ABS prints.
One disadvantage of this enclosure is that the number of improvements is limited. Plus, there won’t be much visibility unless you cut off parts of the mats and cover the holes with a glass plate or sheet. Accessibility is a much easier fix: remove a panel to gain access to your printer.
This less expensive enclosure is incredibly simple to put together. Mats are generally available for roughly $35.
- Cost: ~$35
- Visibility: None
- Accessibility: Removable panels
- Assembly: Easy

Ender 3 V2 Enclosures: 6 Simple Options
Build: Wood
Next, a wooden enclosure is a fantastic way to keep your Ender 3 warm. This DIY option often uses wooden panels, possibly an acrylic panel, and simple hardware.
While wood isn’t known for its insulating qualities, it’s still a suitable material for printing ABS. A wooden enclosure should also prevent air drafts, depending on how securely the panels are bound.
To build holes in the enclosure for wiring and cords, you’ll need some wooden panels, screws, and woodworking tools. For accessibility and visibility, placing an acrylic panel in the front as a door or removable panel is a brilliant idea if you’re building this type of enclosure on your own.
While there aren’t many guidelines on making a wooden 3D printer enclosure, wood is simple to work with: just cut and drill. You may find all of the components for this enclosure at a local hardware store or online. You should expect to pay roughly $100 for this style of enclosure.
- Cost: ~$100
- Visibility: One side
- Accessibility: Door or removable panel
- Assembly: Medium
Ender 3 V2 Enclosures: 6 Simple Options
Buy: Creality
Then there’s Creality’s Ender 3 enclosure. It encloses your Ender 3 and traps heat with a simple pipe frame and an aluminum-like fabric. Creality claims that its enclosure should reduce printing noise in addition to insulating your printer.
The enclosure’s front feature is a zipper door. It’s also tall enough to accommodate the filament spool. And a translucent plastic sheet looks like fabric. Customers have said that the pouches for keeping tools in the enclosure are handy. If necessary, you can even fold it for transportation.
The official Creality enclosure is generally pre-assembled and comes in various styles.
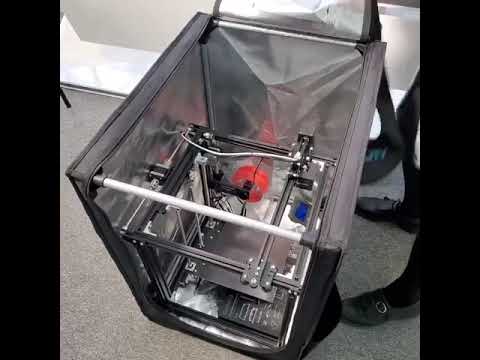
- Cost: ~$75-85
- Visibility: One side
- Accessibility: Zipper door
- Assembly: Easy
Ender 3 V2 Enclosures: 6 Simple Options
Buy: 3DUpFitters
3DUpfitters creates and distributes enclosures and enclosure components for 3D printers, such as the Ender 3. Their Ender 3 enclosure is constructed of acrylic panels and framing brackets, adding structural support. While acrylic isn’t the most insulating substance, it’s perfect for printing ABS and other similar materials.
This enclosure includes a hinged door for convenient access. Also, you’ll get an excellent 360° view of your Ender 3 because it’s primarily composed of acrylic. It also includes a spool holder and a small 5-V fan for your electronics. You may expect to pay around $300 for this elegant casing. You also have the option of purchasing enclosure accessories such as filters, sensors, and lights separately, which will, of course, increase the price.
Because the enclosure is a kit, you’ll have to put it together, but it shouldn’t be too difficult because you’ll have all the necessary pieces.
- Cost: ~$300+
- Visibility: All-around
- Accessibility: Hinged door
- Assembly: Medium
Ender 3 V2 Enclosures: 6 Simple Options
Buy: HotBox V2
Finally, Wham Bam Systems, a manufacturer of 3D printer build plates and enclosures, created the HotBox V2. Another excellent alternative for the Ender 3 enclosure is their HotBox V2 enclosure, which provides good visibility, movement, and more.
The HotBox is insulated with nylon 600D fabric, coated with a fire-resistant material for added safety. This enclosure has a robust structure and a wide front window, with only five sides (the “earth” is the sixth). For access to your Ender 3, the top and front flaps can easily be unzipped and folded backward.
More minor features include pouches for holding tools, light loops, filament passage, cable holes, and even a built-in thermometer that displays the temperature inside the enclosure. This insulating and lightweight enclosure folds up for convenient transit. Also you can attach the filament spool to the top.
This enclosure is similar to the official Creality alternative; however, it is a little more expensive and potentially more durable. Thankfully, there isn’t much to put together.
- Cost: ~$120
- Visibility: One side
- Accessibility: Zipper door for the top and front panel
- Assembly: Easy


2 Comments
Pingback: Is it Safe to Breathe 3D Printer Fumes? | howto3Dprint.net
Pingback: How Much Electricity Does a 3D Printer Use? | howto3Dprint.net