Table of Contents
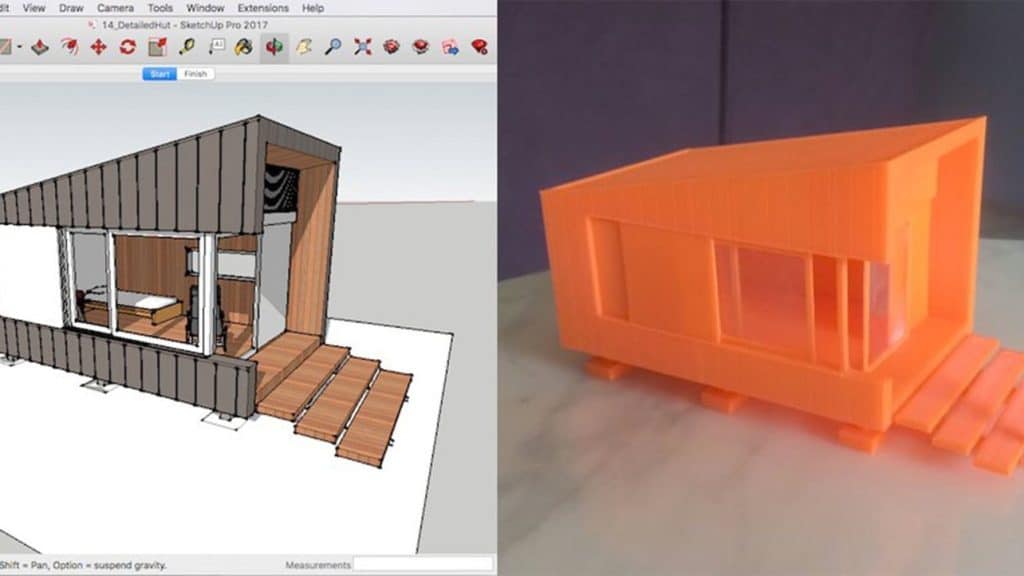
As we continue to explore the world of 3D printing, we stumble upon countless software programs that help us create and manipulate 3D models. One of the most popular and widely used programs is SketchUp. In this article, we’ll dive into the fascinating process of using SketchUp for 3D printing, discussing its features, advantages, and how you can bring your ideas to life.
What is SketchUp?

SketchUp is a powerful 3D modeling software that is widely used by professionals and enthusiasts alike. It is known for its user-friendly interface and intuitive tools that make it easy for users to create complex models. SketchUp’s versatility makes it suitable for various applications, including architecture, interior design, woodworking, and, of course, 3D printing.
Why Use SketchUp for 3D Printing?
SketchUp offers numerous advantages for those looking to create 3D printable models:
- Ease of Use: SketchUp’s user-friendly interface and tools make it easy for beginners to start designing their models. The software also offers various tutorials and resources for users to learn and improve their skills.
- Compatibility: SketchUp supports a wide range of file formats, including STL and OBJ, which are commonly used for 3D printing.
- Community: SketchUp boasts a large and active community that provides support, resources, and even 3D models that users can download and modify for their projects.
- Plugins: The software supports various plugins that can enhance its functionality and streamline the 3D printing process, such as Solid Inspector² and Skeinforge.
Designing for 3D Printing in SketchUp
To design a 3D printable model in SketchUp, follow these steps:
- Choose the Right Template: When you start a new project in SketchUp, make sure to choose a template that matches the units you’ll be using for your 3D print. This ensures that your model is created at the correct scale.
- Model with Solid Geometry: To create a 3D printable model, it is essential to use solid geometry. This means that your model should be airtight and not contain any gaps or overlapping surfaces. To check your model for errors, use the Solid Inspector² plugin.
- Optimize Your Model: To save on printing time and material, optimize your model by reducing unnecessary geometry and using the hollowing tool to create internal cavities.
- Export to a 3D Printable Format: Once your model is complete, export it as an STL or OBJ file, which can be read by most 3D printing software.
Real-Life Example: Creating a Custom Planter
Imagine you want to create a unique planter for your home. Using SketchUp, you can easily design a custom planter that suits your taste and needs. To do this, follow these steps:
- Start by creating a basic shape for your planter, such as a cylinder or a box. Make sure to use solid geometry.
- Add details and customization to your design. You can create patterns, add text, or even design a drainage system.
- Optimize your model by hollowing it out to save on printing material and reduce the overall weight of the planter. Make sure the walls of the planter are thick enough to support the structure and retain soil and water.
- Check your model for errors using the Solid Inspector² plugin to ensure it’s airtight and free of any overlapping surfaces or gaps.
- Export your planter design as an STL or OBJ file.
- Import the exported file into your preferred slicing software, such as Cura or PrusaSlicer, to prepare it for 3D printing. Adjust settings such as infill, layer height, and support structures as needed.
- Send the sliced file to your 3D printer and begin the printing process.
- After your custom planter is printed, remove any support structures and clean up the print as needed. If desired, you can sand, paint, or apply a clear coat to finish the planter.
- By following these steps, you can easily create a unique and functional planter that adds a personal touch to your home or garden. The process can also be applied to designing and 3D printing various other objects, showcasing the versatility and power of SketchUp in the world of 3D printing.
SketchUp vs. Fusion 360

While SketchUp is a fantastic tool for both beginners and professionals alike, it’s essential to consider other 3D modeling software on the market. One popular alternative is Autodesk’s Fusion 360. In this section, we will compare SketchUp and Fusion 360 to help you understand their differences and decide which software best fits your needs.
- Ease of Use: SketchUp is known for its user-friendly interface and intuitive design tools, making it an excellent choice for beginners or those with limited 3D modeling experience. Fusion 360, on the other hand, has a steeper learning curve and requires a deeper understanding of CAD (computer-aided design) principles. While Fusion 360 is more powerful, it may not be as accessible to new users as SketchUp.
- Purpose: SketchUp is geared primarily towards architectural and interior design, product design, and landscape design. Fusion 360, on the other hand, is a more versatile CAD tool that includes features for product design, engineering, and manufacturing. If you’re focused on architecture or design, SketchUp may be more appropriate, while Fusion 360 is better suited for engineering and manufacturing projects.
- Collaboration and Cloud Integration: Fusion 360 has built-in cloud integration, making it easy to collaborate with team members and share files with clients. SketchUp does offer some cloud-based features through its web-based version, but it is not as seamless as Fusion 360’s cloud capabilities.
- Cost: SketchUp offers a free version for personal use and various paid plans for professional use. Fusion 360, on the other hand, is subscription-based with pricing options for personal, educational, and commercial use. The cost may be a significant factor in your decision-making process, so it’s essential to evaluate your budget and the features you require.
- Simulation and Analysis: Fusion 360 has advanced simulation and analysis capabilities, allowing you to test the performance and durability of your designs. SketchUp lacks these features, which may be a downside if you require advanced testing and analysis for your projects.
- Community and Support: Both SketchUp and Fusion 360 have active communities and extensive support resources. You’ll find online forums, video tutorials, and dedicated support teams for both software options.
In conclusion, your choice between SketchUp and Fusion 360 will depend on your specific needs, budget, and experience level. SketchUp is an excellent option for beginners and those focused on architecture, design, or landscape projects, while Fusion 360 is better suited for engineering and manufacturing tasks. Consider the features, cost, and learning curve of each software to determine which one is the right fit for you.
Top 5 SketchUp Tips and Tricks

To help you make the most of SketchUp and enhance your 3D modeling experience, here are the top 5 tips and tricks to incorporate into your workflow:
- Use Keyboard Shortcuts: Keyboard shortcuts save you time and increase your efficiency when working in SketchUp. Familiarize yourself with the most commonly used shortcuts, such as M for Move, R for Rectangle, and L for Line. You can also customize your own shortcuts by going to “Window” > “Preferences” > “Shortcuts” and assigning keys to your preferred tools.
- Leverage Components and Groups: Grouping and creating components are essential for organizing your model and preventing geometry from sticking together. Use the Group function to isolate and protect geometry, while components can be used for repeated objects, like windows or furniture. Components also help in reducing file size, as they share a single definition, making your model more efficient and easier to manage.
- Utilize Layers and Tags: Layers (in SketchUp 2020 and earlier) and Tags (in SketchUp 2021 and later) help you control the visibility of various elements in your model. Organize your model by assigning different elements to appropriate layers or tags, allowing you to hide or show specific parts of your project quickly. This can be particularly helpful when working on complex models with multiple components or design variations.
- Master the Follow Me Tool: The Follow Me tool allows you to extrude shapes along a path, making it perfect for creating complex 3D objects like molding, pipes, or curved surfaces. To use the Follow Me tool, first, draw the path you want the shape to follow, then select the path, activate the Follow Me tool, and click on the face you want to extrude. This powerful tool can save you time and help you create intricate designs with ease.
- Keep Your Model Clean and Organized: Maintaining a clean and organized model is crucial for efficient and accurate work. Regularly purge unused components, materials, and layers to reduce file size and improve performance. Use the “Window” > “Model Info” > “Statistics” panel to find and delete unnecessary elements. Additionally, make sure to correctly align your geometry to the axes and avoid working with small or overly detailed objects that can cause performance issues.
By incorporating these tips and tricks into your SketchUp workflow, you’ll find yourself working more efficiently and effectively, ultimately creating better models and improving your overall 3D modeling experience.
Frequently Asked Questions
What is SketchUp?
SketchUp is a 3D modeling software that allows users to create, edit, and visualize objects in three dimensions. It is widely used for various applications, such as architecture, interior design, landscape design, urban planning, and 3D printing.
Is SketchUp suitable for beginners?
Yes, SketchUp is known for its user-friendly interface and ease of use, making it an excellent choice for beginners. However, it also has advanced features that can be used by professionals and experienced users.
Can I use SketchUp for 3D printing?
Yes, SketchUp can be used to design 3D printable models. It allows you to create precise and detailed models that can be exported in various file formats compatible with 3D printers, such as STL and OBJ.
How do I export a SketchUp model for 3D printing?
To export a SketchUp model for 3D printing, you need to ensure that your model is watertight and free of errors. Once this is done, you can export the model in a format compatible with 3D printers, typically STL or OBJ, using the export function or an appropriate plugin.
Is SketchUp free?
SketchUp offers a free version called SketchUp Free, which is a web-based application with core 3D modeling functionalities. There are also paid versions, such as SketchUp Shop and SketchUp Pro, which offer additional features and tools for professional use.
What are some popular plugins for SketchUp?
Some popular plugins for SketchUp include SketchUp STL (for exporting STL files), Solid Inspector² (for identifying and fixing model errors), and RoundCorner (for creating rounded edges). These plugins can be found in SketchUp’s Extension Warehouse or through third-party websites.
Can I use SketchUp with other design software and hardware tools?
Yes, SketchUp can be integrated with various design software and hardware tools, such as CAD programs, rendering software, virtual reality systems, and laser cutting machines. This integration allows for innovative design workflows and enhanced user experiences.
Where can I find tutorials and resources for learning SketchUp?
SketchUp’s official website offers numerous tutorials, forums, and learning resources for users of all skill levels. Additionally, there are many online platforms, such as YouTube, that feature SketchUp tutorials and tips from experienced users.
Conclusion
SketchUp’s versatility as a 3D modeling software extends far beyond the creation of simple planters. Its ease of use and powerful features make it an ideal choice for users of all skill levels, from hobbyists to professionals.
In addition to designing 3D printable models, SketchUp can be used in a wide range of applications such as architecture, interior design, landscape design, urban planning, and even video game design. The software’s adaptability allows users to tackle a multitude of projects with confidence.
Furthermore, SketchUp’s thriving community of users and extensive library of plugins and extensions make it a highly customizable platform that can be tailored to suit individual needs. By exploring and leveraging the resources available, users can continually expand their knowledge and skills within the program, further unlocking its potential.
Moreover, the integration of SketchUp with other software and hardware tools, such as virtual reality systems and laser cutting machines, opens up new possibilities for innovative design workflows and immersive experiences.
In conclusion, SketchUp’s capabilities as a 3D modeling tool for designing 3D printable models are just the tip of the iceberg. By embracing the software’s full potential and continually pushing the boundaries of design and creativity, users can create not only unique and functional objects but also contribute to the growing world of digital fabrication, transforming the way we envision and interact with the physical world around us.
Ready to unleash your creativity and explore the world of 3D modeling? Why not give SketchUp a try and see how it can revolutionize your design process today?
Let us know in the comments below or on our Facebook page to let us know your ideas, and we would appreciate seeing pictures of your works of art!


