Table of Contents
Designers and engineers frequently need to modify, improve, complete, and edit STL files for 3D printing. Modern software for working with triangle meshes, or as its creators like to refer to it, the “Swiss Army Knife” for editing STL files and 3D meshes, is Autodesk’s Meshmixer.
With Meshmixer, it’s possible to resculpt entire sections, stylize the model, or add useful features in addition to optimizing triangle meshes.
The good news is… MeshMixer is totally free to download.
This manual outlines 10 expert suggestions for novice and experienced users to enable designers to modify their 3D models with this flexible software.
Pick a file format that can accurately represent the design, is suitable for the intended applications, and requires the fewest number of file conversions when starting a project. Numerous 3D file types, including STL, OBJ, PLY, and some obscure ones like AMF, 3MF, OFF, and the native MIX format, can be read by Meshmixer. Meshmixer also supports Collada, VRML, and Smesh for design export to other formats.
- STL (STereoLithography): The most widely used file format for 3D printing is STL (STereoLithography), which was initially created for stereolithography. It only contains geometry data and is small in file size.
- OBJ: A 3D mesh can be represented by a simple format called OBJ, which Wavefront first developed. It also stores the surface normal and a UV coordinate that can be mapped to an external texture in addition to vertex positions.
- PLY (Polygon): A more comprehensive format called PLY (Polygon) was created at Stanford to help store 3D scanning data. One of its advantages is the ability to assign properties separately, like texture data, to each side of a face.
- AMF (Additive Manufacturing Format): An alternative to STL for 3D printing is AMF (Additive Manufacturing Format). It will store additional information, including orientation, scale, patterning multiple objects, non-planar edges, and graded materials because it is XML-based.
- 3MF (3D Manufacturing Format): AMF is similar to 3MF (3D Manufacturing Format), but 3MF is less standardized because a group of businesses developed it. It was first created by Microsoft and is the default 3D format in Windows.
- OFF (Object File Format): A straightforward, manually programmable text-based format, OFF (Object File Format) stores color information for each vertex and the geometry.
- Collada (COLLaborative Design Activity): Sony created the adaptable Collada (COLLaborative Design Activity) format, which is perfect for digital assets. Using the widely accepted format, developers can store rendering information like animations, level-of-detail shaders, and diffuse, normal, and specular maps.
- VRML (Virtual Reality Markup Language): Although scriptable and compatible with web browsers, VRML (Virtual Reality Markup Language) is similar to Collada.
- Smesh: Triangles and complex polygons are used to describe 3D geometry in the straightforward format of Smesh. The format is better suited for objects with large planar areas.

For sculptural and geometrical files, a comparison to the standard STL file format reveals that 3MF and Smesh are more efficient formats. At the same time, AMF is more versatile and expensive in terms of space.
Tip #1: Remeshing
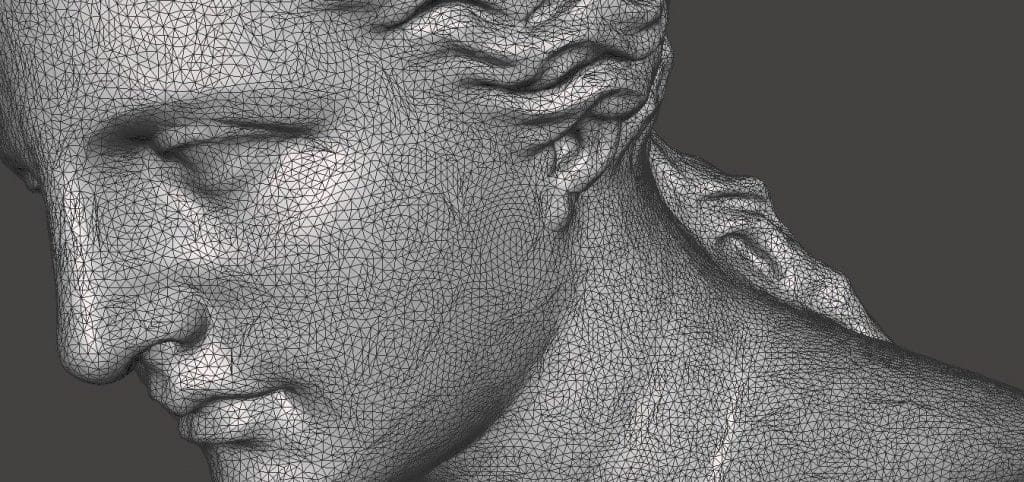
Make sure to maximize a part’s triangulation before making any modifications. In our illustration, we chose a Venus of Milo model with a lopsided distribution of triangles and some split and collapsed triangles. Using the Remesh command in Meshmixer, you can tessellate a surface evenly.
Use Ctrl + A to select the entire object or an area to be remeshed by clicking the Select Icon in the menu. Press R to select Edit > Remesh from the Popup menu. Several Remesh Modes exist:
- Target Edge Length: Target Edge Length guarantees uniform triangle size across the mesh, making the part more sculptable. Set a reasonable size for the object because this requires a lot of computation.
- Relative Density: Similar methodology, but focusing on triangle density, is called relative density.
- Adaptive Density: In areas with greater detail, adaptive density produces a denser triangulation, reducing file size. When the object is finished and ready to be saved for 3D printing, this is useful.
- Linear Subdivision: By splitting already-existing triangles, linear subdivision merely adds more triangles while preserving the original geometry.

Remember that the Regularity setting sacrifices more detail while producing more equilateral triangles. The original mesh and the remeshed section are gradually introduced thanks to the Transition setting. When Preserve Group Boundaries is checked, the program preserves the shape of specially created triangle groups, such as perfectly round eyes. Hard corners are not smoothed when the Preserve Sharp Edges option is selected. A Free Boundary is frequently preferred under Boundary because it trades accuracy for mesh quality.
Tip #2: Separating Sections

A part of a mesh can be separated in several ways using Meshmixer. The easiest way to separate a part is to first choose it, then use the Edit Extract (Shift+D) command. The program will create a new shell with an optional offset distance. Your part will expand or contract if you select the Normal offset direction. Select Edit Separate Shells from the main menu to individually save and name each component while removing unnecessary sections.

“Edit > Plane Cut” is the alternative technique. This activates a transform tool that enables cutting plane orientation. The blue arrow indicates the direction of cutting. It is possible to make a selection before cutting if a plane might remove unwanted sections. Hit “Edit > Plane Cut” from the pop-up rather than the main menu while the selection is active.
Tip #3: Sculpting Basics
Meshmixer provides several brushes that can be used directly on the mesh in the Sculpt section. The following Volume brushes provide every feature needed for simple 3D sculpting work:

- Drag moves an area in 3D space
- Draw moves vertices along the brush region’s normal as if drawing on a surface.
- Flatten shifts the brush region’s vertices toward the area’s average normal.
- Inflate translates vertices along their normal
When you hold Ctrl while sculpting, the brush changes its function so that it deflates instead of inflates and draws instead of debosses. Use the straight bracket ([and]) hotkeys to quickly change brush size or the left and right arrows to cycle through recently used brushes. Holding Shift activates RobustSmooth, the suggested secondary brush. To define the overall volume, the sculptor can quickly switch between manipulation and smoothing brushes.
The Draw brush with a spiky falloff pattern works well for adding detail. This produces very sharp lines when used in conjunction with the pinch brush. Surface brushes are excellent for including detail. Custom stencils enable the quick creation of complex textures. Use the Refine Brush in the Volume section to add triangles for more detail, or make sure to allow refinement (hotkey R).
Applying the same sculpting operation across a symmetry plane is possible with the hotkey Checking Symmetry (Shift + S). Click the toolbox icon next to the command to manually place the symmetry plane after it has been checked.
Tip #4: Combining Meshes

Import both meshes or drag them from the Meshmix library to combine them into a single mesh. The two objects are integrated into a single shell using a sophisticated algorithm. To position each object, choose “Edit > Transform” from the main menu after selecting the object in the Object Browser. Select both objects, then launch the Union Boolean command, which is the proper Boolean operation. If the object has multiple shells, use the “Edit > Separate Shells” command first. A Boolean Difference command subtracts the second selected object from the first. Meshmixer’s special implementation of the Boolean script allows it to function on surfaces in addition to solid models.
The intersection curve between the two objects will be maintained in Precise or Max Quality mode. At the same time, Fast Approximate is much quicker and typically sufficient. Two red objects are produced if the Boolean operation fails. If so, increase the Search Depth parameter to boost your chances of success. The quality is improved by checking Use Intersection Curves. The target edge scale determines the triangles close to the intersection’s size in relation to the surrounding triangles.
Tip #5: Mesh Repair (STL Repair)

A mesh can be repaired in a variety of sophisticated ways using Meshmixer. Making a hole can occasionally be advantageous for removing an irregular area. In that case, switch to Select mode and draw a lasso around the area you want to remove. To delete all selected faces, press Delete or Edit > Discard (X). To find the hole, choose Analysis > Inspector. Minimal Fill requires the fewest triangles to fill the hole out of all the options in the dropdown menu. A Smooth Fill conforms the patch to the curvature of the surrounding area, while a Flat Fill makes the patch as flat as possible. Vehicle Repair Usually, all intersecting holes are filled.
“The Edit > Erase and Fill (F)” operation from the popup menu can also be used to select the area to be deleted. Other techniques that will fill all holes are “Edit > Make Solid and “Edit > Replace and Fill”. The improved site will be completely merged into the model with one more pass of the RobustSmooth sculpting brush.
What is your top tip to edit STL files for 3D printing?
Let us know in the comments below or on our Facebook page to let us know your ideas, and we would appreciate seeing pictures of your works of art!
All Image Credit: https://formlabs.com/


