
If you’ve ever embarked on a 3D printing project, you’ll know that the process is not as straightforward as it might initially seem, particularly when you choose to step away from rigid filaments like PLA or ABS and venture into the world of flexible filaments, such as TPU or TPE. To save you the trouble of experimenting, this comprehensive guide is dedicated to helping you unlock the best techniques for printing with flexible filament on your Ender 3 printer.
A Gentle Leap into the Flexible Filament World
It might be wise not to go fully flexible when starting with flexible filaments. Instead, try something like Filaflex 95A or TPU 98A. These filaments are still flexible but not overly so, making them easier to manage in a Bowden extruder setup, like the one you have on your Ender 3.
You can run into problems like bending and clogging when dealing with flexible filaments. This is due to the filament’s need to travel through a long PTFE tube before reaching the hotend in a Bowden setup. Choosing a filament with a slightly higher Shore Hardness (like 95A or 85A) helps avoid these problems as it travels through the extruder more easily.

Bowden Extruder: Upgrades and Modifications
Though printing less flexible filament with most Bowden extruder 3D printers is possible without requiring upgrades, sometimes modifications can ease the process. This might involve altering the PTFE tube, adding a Capricorn tube, or installing other upgrades that help guide flexible filament more smoothly into the hotend.
When it comes to Capricorn tubing, its reputation is deserved. It has a tight tolerance and high precision that reduces clogging and guides the filament directly into the hotend without issue. For those using the Ender 3, you might also consider checking out the Efficient Extruder by Fluxma or the Flexible Filament Extruder Upgrade, both available on Thingiverse.
The Direct Drive Extruder: An Ultimate Solution?
If you’re looking for a near-universal solution for flexible filaments, converting to a direct drive, extruder might be the answer. With a direct drive, the extruder motor and the hotend are very close, reducing the amount of travel for the filament. This proximity eliminates inconsistency, poor retraction control, and oozing or stringing often seen in Bowden setups.
Some options to consider are the Creality Sprite Extruder or the Creality Ender 3 Direct Drive Extruder Kit from Amazon. For those who prefer DIY solutions, the SpeedDrive V1 Direct Drive Mount from Thingiverse is also viable.
The Virtue of Patience: Slow Printing Speed
While the speed of printing can be an attractive factor, slower is better when it comes to flexible filaments. Start with a high speed, but if the nozzle starts clogging, don’t hesitate to pause your print, fix the clog, and restart the process at a lower speed. As a rule of thumb, speeds of around 20mm/s to 35mm/s for Bowden extruders and up to 50mm/s for direct drives tend to work well.
Playing with Temperature: Nozzle and Heated Bed

temperature settings of your 3D printer. For the Ender 3, TPU generally prints well at nozzle temperatures between 200°C – 230°C. If you notice excessive stringing, try lowering the temperature. Too cool, and the filament may not extrude properly.
The bed temperature is another critical factor. It should be set between 50°C – 60°C for better adhesion. Remember, a higher temperature can cause the filament to stick too much to the bed, which can be problematic when removing the printed object.
Proper Bed Levelling and First Layer Calibration
Bed leveling is a crucial aspect of 3D printing, regardless of the filament type. However, with flexible filaments, an improperly leveled bed can cause an array of issues like bad first-layer adhesion, excess stringing, and blobs of filament. Hence, ensure that your bed is well-leveled before you start the print.
Calibrating the first layer height is another technique to ensure optimal adhesion. Start with a thicker first layer (e.g., 0.3mm) for better grip and a slower first layer print speed to give the filament more time to adhere.
No Need to Rush: Opt for a Gradual Cooling
Flexible filaments, unlike their rigid counterparts, don’t appreciate rapid cooling. Sudden cooling might lead to warping or shrinking. So, it is recommended to cool your printed objects to avoid deformities gradually.
Also, consider keeping your cooling fan speed low. High fan speeds might solidify the filament before it gets deposited onto the print bed, leading to blockages and inconsistent extrusion.
Retraction Settings: Play Around
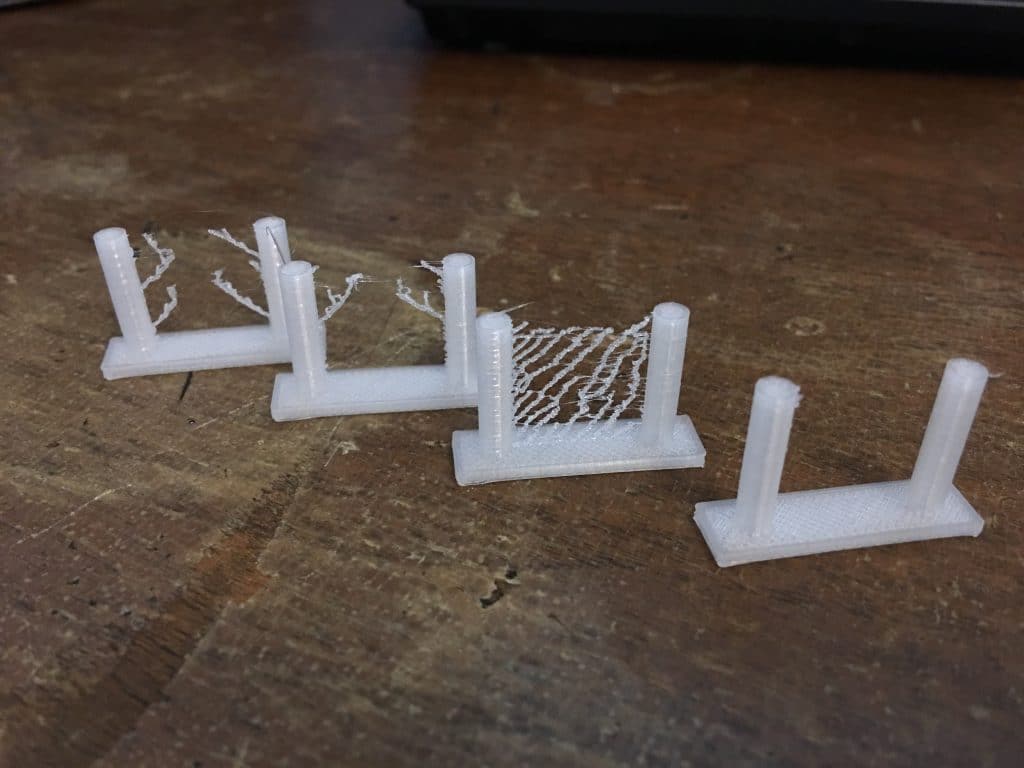
Flexible filaments can be tricky to deal with regarding retraction settings. For Bowden extruders, you may want to start with a retraction distance of 4-6mm, whereas for direct drive extruders, somewhere around 1-2mm should suffice. If you notice stringing, incrementally increase the retraction distance. But remember, too much retraction can lead to clogging, so it’s a bit of a balancing act.
Layer Resolution and Shell Thickness
You’ll want to work with a higher layer resolution to get the best from your flexible prints. Around 0.1mm to 0.2mm tends to work well for TPU on an Ender 3.
For wall thickness, consider going a bit higher than usual. It will lend your prints more rigidity, which is beneficial with flexible filaments. Depending on the flexibility of the filament, you might want to use a wall thickness of around 1.2mm to 2.4mm.
FAQ
Summing It Up
With the careful setup, the right filament, and a keen eye on your printer’s settings, you can master printing with flexible filament on your Ender 3. The journey might seem overwhelming initially, but the reward will be immensely satisfying as you explore, experiment, and embrace this process.
Working with flexible filaments allows you to create prints with unique characteristics and applications. With a slightly increased shore hardness, you can create semi-flexible items like protective casings or insoles. If you opt for the extreme end of flexibility, you can print things like phone cases, squishy toys, and more!
The 3D printing community is always evolving and expanding, as are our tools and techniques. Mastering the printing of flexible filament opens up a world of possibilities. With the help of these techniques and strategies, and by making the most of your Ender 3 printer, you’ll be well on your way to achieving your 3D printing goals.
Don’t fear the challenges you might face when printing with flexible filaments. The experience will make you a better 3D printing enthusiast and expand your knowledge and skills in the 3D printing world. After all, it’s in overcoming the challenges that we find our greatest successes. Happy 3D printing!


