
Many users have reported problems with their Ender 3 not detecting or connecting to their PC. This article will review various solutions that have helped numerous users to connect Ender 3 to PC.
If you followed all of the steps in our How To Connect Ender 3 To Pc: Step By Step Guide, you should be able to connect your Ender 3 to your PC. Here are a few solutions you should consider if you’re still having issues with the connections.
1. Install the Right Drivers
The port drivers must be installed for the Ender 3 to connect to the 3D printer. Windows or macOS won’t be able to communicate with the 3D printer without the proper drivers.
Your printer might be listed in the device manager, but it won’t be adequately identified. A user encountered a similar issue when Cura failed to recognize their 3D printer.
They attempted to fix the problem by launching the device manager, unplugging the cable, and then replugging it. Still, they encountered an error message explaining how the printer driver wasn’t installed correctly. They, therefore, established the proper Ender 3 drivers on their PC to fix it. The CH340 or CH341 drivers are necessary for the Ender 3 to function correctly with a PC.
To be safe, you can download and install both on your PC.
For detailed explanation check our How To Connect Ender 3 To Pc: Step By Step Guide
2. Use the Correct USB Cable for the Connection

The proper USB cable is essential To transfer data between the Ender 3 and the PC. Your printer won’t appear in the device manager on your PC if you don’t use a cable designed for data transmission.
An old Micro USB cable was used by one user to try printing via USB. They had to get a newer one rated for data transfer because it didn’t work.
Additionally, some users have complained that certain USB cables cause slow or erratic data transmission. You must use the proper cable because doing otherwise could result in undesirable print flaws.
The USB B cable with the Ender 3 is reliable and sturdy, but later models might not be. For various Ender 3 versions, you can purchase high-quality USB B, Micro USB, and Mini USB on Amazon.
3. Try a Hard Reset
A hard reset can fix the problem if the printer throws an error after consistently working via a USB connection. Power outages failed prints, and other print interference can all cause these connection problems.
The printer can be reset with relative ease. The printer must be turned off, and the printing program must be closed. Next, unplug both of the USB cables. Remove the printer’s plug and leave it out of power for about 30 seconds. Reconnect the cable and then turn on the printer. Reconnect the Ender 3 to the PC using a USB cable, then launch the printer software. Retry establishes the connection. Although it might not be effective for all users, it did for one with this problem.
An additional step to this method was suggested by a Reddit user who had a similar issue:
- Turn off the printer
- Remove the printer’s USB cable.
- Slice a simple print and save it to an SD card
- Print the file from the SD card
- Plug the USB cord into the printer
4. Disable Brltty on Linux
Disabling Brltty on your Ubuntu Linux computer can assist in resolving your connection issues if you use a Linux system. Users who are blind can connect to and use the PC’s terminal thanks to the Brltty accessibility add-on.
You might need to remove the add-on if you aren’t using it because, as one user pointed out, it can affect how well your USB ports work.
Open your terminal and enter sudo apt autoremove ability to remove the Brltty package. It will be removed from your system as a result.
Your Linux computer’s USB connection should now function properly.
5. Check the USB Port for Bent Pins

Your PC and Ender 3 may connect once you check for and straighten any bent pins in your USB ports. The pins in USB ports can occasionally bend due to user or manufacturer errors, resulting in faulty connections.
One user, for instance, had trouble starting a USB connection with their printer. After further investigation, they discovered the 3D printer had a bent pin in its port.
You can fix this issue by shining a light into the USB ports to check for any broken or bent pins. A thin tool, such as a tweezer, can be used to straighten out any bent pins or obstructions.
6. Change your Faulty Motherboard
If you have tried the steps above and none have worked, your motherboard may be defective. It isn’t much you can do if your motherboard is broken.
Simply put, your Ender 3 won’t be able to communicate with your PC. Unless you’re an expert in electronics who can disassemble the board to repair it, you’ll need to replace the board.
You can ask your retailer to send you a replacement if your printer is still covered by warranty. One user was able to get in touch with Creality to request a refund and a replacement.
If not, it’s simple to spend money on a replacement board on Amazon.
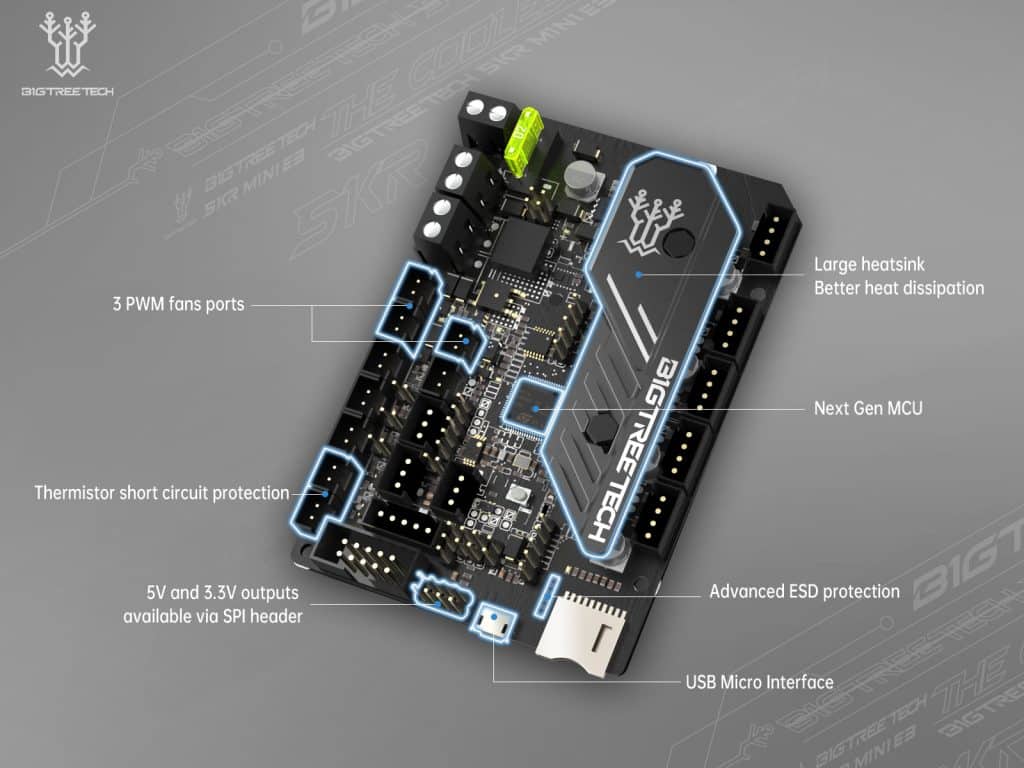
A significant improvement over the Ender 3’s stock board is the SKR Mini E3. It has an improved micro-USB port, silent stepper drivers, and better heat dissipation.
It also has extra ports for the fan and automatic bed leveling systems for the printer.
Check the best deals on Amazon.
BIGTREETECH Upgraded SKR Mini E3 V3.0
How to Fix Cura Not Detecting Ender 3
Today, many slicers offer USB printing. However, one of the most widely used slicers for 3D printing is Cura. It has several features, including USB printing support for many 3D printers. Therefore, we’ll go over Cura fixes in the section that follows. But If you have similar issues, please check your slicer settings to match Cura settings. If Cura isn’t detecting your Ender 3, it may be due to the following matters:
7. Update or Re-Install Cura

The most recent version of Cura can assist in resolving any USB connection problems. This is due to the possibility that some outdated versions contain bugs that prevent your PC from making a USB connection to the printer. Therefore, finding a more recent, stable version to install on your PC is preferable. It’s also important to note that some people, including one user, have successfully resolved connection problems by performing brand-new Cura installations on their PCs.
They removed Cura from Windows’ Program Files folder, deleted all its saved files, and then reinstalled it. The connection problems were resolved by using this procedure. See if it works for you to see if you can keep your configuration files and saved data.
8. Set The Right Printer Profile

For Cura to understand how to communicate with the printer, you must set the appropriate print profile for the printer. If you tell Cura that your printer is an Ender 3, which it can support, it will be able to adjust its settings accordingly.
Click on the printer’s upper-right corner dashboard to see if the settings are correct. You must change it if the printer there is not the same model as your printer.
Here’s how to go about it:
- Click on the Printer name. Next, select Add Printer.
- On the menu, click on Add a Non-Networked Printer. Choose your printer’s model from the Creality category on the drop-down list.
- Click on “Add”
9. Install the USB Printing Plugin
Cura is an add-on that enables PCs to connect to printers via the USB printing plugin. Your printer won’t be able to communicate to Cura on your PC if it is not allowed.
On Cura, the USB printing add-on is typically activated out of the box. However, in the circumstances like this, you should double-check.
- Click on the Cura Marketplace icon.
- To view the installed plugins, select the settings icon. Until you see USB Printing, scroll down.
If it isn’t, you can use the plugins tab to look for it and install it.
10. Set a Longer Connection Timeout
Setting a longer timeout can help with your Cura connection issues if you recently updated the bootloader or firmware on your Ender 3.
Because the bootloader takes longer to load, these problems arise because the USB connection times out before it can complete loading. Due to this, numerous users consistently complain about these problems after updating their firmware.
Here’s how you can fix this:
Step 1: Open the USB plugin’s AutoDetectBaudJob.py file.
- On macOS, you can find it at: Mac > Applications > Ultimaker Cura > Content > Resources > plugins > plugins > USB printing.
- On Windows, you can find it at C:\ Program Files\ Ultimaker Cura \ Share \Plugins \USBPrinting
- Open it in an IDE like VS Code.
Step 2: Change the wait bootloader time
- On line 26, you should see an array named “wait_bootloader_times”
- Change the values in the array to [5,15,30].
Step 3: Save the files and restart Cura

To learn more about the procedure, watch the video.
11. Use The Right Firmware for Your Printer
Cura’s only supports a few particular versions of firmware and G-Code for printing. One of these is Marlin, the Ender 3’s out-of-the-box default firmware. However, Cura might not recognize your Ender 3 if you upgraded or flashed it with a new type of firmware. If you want to use wired printing with that printer via Cura, you might need to revert to the factory default firmware.
A great way to print and manage the Ender 3 printer is by connecting your PC to it. However, you might consider a better option, like OctoPrint, if you want better performance and connectivity.
Let us know in the comments below or on our Facebook page to let us know your ideas, and we would appreciate seeing pictures of your works of art!


