
In 3D printing, infill is critical to a part’s strength, structure, and weight. Continue reading to find out more.
What Is 3D Printing Infill?
Unlike most other manufacturing techniques, 3D printing enables one to precisely monitor two mutually exclusive but comprehensive aspects of a part: exterior walls (or perimeters) and infill. No matter how thick, the walls form the part’s outermost regions, while the infill is whatever occurs within them.
Though one has some influence over the walls, the infill is much more complex and plays a significant role in a part’s strength, weight, composition, elasticity, and other properties. In 3D printing, several parameters control the form of infill used for 3D printed objects. When the slicer software converts the 3D model into G-code instructions, you should set these parameters.
The two most critical parameters are infill density and infill pattern. This post will cover the fundamentals of these concepts and some of the more common densities and trends. But first, let’s look at “infill” in a few different production processes to understand better how it works in 3D printing.

Traditional Manufacturing vs. 3D Printing
3D printing infill differs from other, more conventional production processes. Let’s look at injection molding and subtractive Manufacturing as examples.
Injection molding is the process of injecting material into a mold to create a part. Controlling internal structures is, as you would expect, impossible due to the design of this process. As a result, injection-molded sections are either solid or hollow (in the case of gas injection molding), with no in-between.
Like CNC machining, subtractive Manufacturing involves removing material from a larger piece of stock. Infill, like injection molding, cannot be modified because the interior is solid.
Meanwhile, 3D Printing entails the selective extrusion of material in nearly every pattern. Let’s take a closer look at the various infill density and pattern choices.
Density
3D Printing Infill density refers to the “fullness” of a part’s interior. This setting is a percentage between 0 and 100 in slicers (0 indicating a hollow item and 100 meaning a tangible 3D print). As you would expect, this has a significant effect on a part’s weight: the fuller the piece’s interior, the heavier it is.
In addition to weight, infill density influences print time, content use, and buoyancy. Power is, too, but in conjunction with several other factors such as material and layer height.
Some slicers also support varying infill densities within the same element. It is known as variable infill density, and you can define any density changes you like for different areas of your print using unique settings in the slicing software. We’ll come back to this subject later.

What 3D Printing Infill Percentage Should I Use?
We recommend an 3D print infill density of 15-50 percent for most “ordinary” prints that don’t need to be super heavy. This density percentage reduces print time, saves paper, and provides adequate power.
Strong functional prints are needed. As a result, we suggest using a higher 3D printing infill: more than 50% (but don’t be afraid to go as far as 100%). Since the setting is so high, be prepared to wait longer for the print and use more filament. The payoff would be a more significant and more powerful portion.
Use an infill density of 0-15 percent for small figurine models intended for display only. This value will produce a reasonably fast print while using tiny filament. Models printed in this density range will be lightweight and weak.
Finally, for parts printed in flexible materials such as TPU, any infill density should be adequate. However, keep in mind that the higher the 3D print infill density, the less flexible the element will be.
RECOMMENDED SETTINGS FOR 3D PRINTS TYPES
Standard: 15-50%
Functional: 50-100%
Figurine and model: 0-15%
Flexible: 1-100%
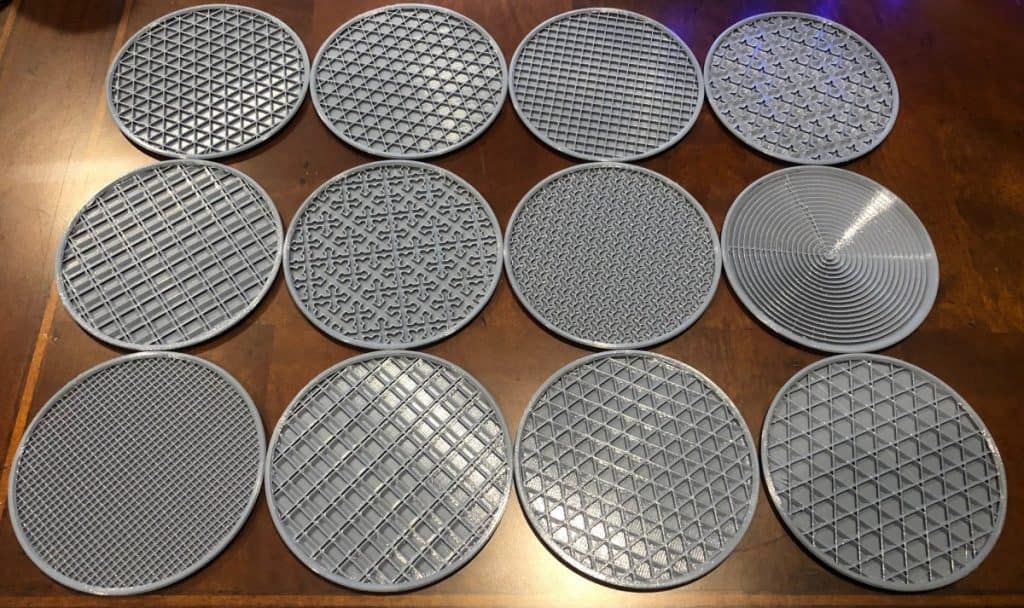
Pattern
The form and shape of the material within a component are known as the infill pattern. 3D printing infill patterns can affect a part’s strength, weight, print time, and even flexibility. They can range from primary lines to more complex geometric shapes.
There are a variety of infill patterns available in different slicer programs. Cura (4.7), for example, offers 13 different 3D print infill patterns, as does PrusaSlicer (2.3). There are only six in Simplify3D.
For some features, specific patterns are better than others, similar to infill density. Complexity, material quality, and the number of planes of connective strength are all characteristics of different infill patterns (2D or 3D). The gyroid pattern, for example, links walls in three dimensions, increasing overall power. As a consequence, compared to patterns like lines, this pattern consumes more content.
Which Pattern Should I Use?
Make sure you select a pattern that is appropriate for your part. Here’s a summary of ten popular options:
- Lines: Every other layer in the lines 3D print infill pattern has lines printed in one direction (either along the X- or Y-axis). This infill pattern is suitable for quick prints because it generates strength in only two dimensions. The lines pattern conserves material and keeps the weight to a minimum.
- Honeycomb: This pattern, as the name suggests, creates a honeycomb structure, which is visually appealing. This 3D printing infill pattern is suitable for semi-fast prints requiring moderate strength, and it should not consume excessive material.
- Grid: The grid 3d print infill pattern resembles lines in appearance, but rather than one-directional lines every other layer, it produces two-dimensional lines every layer, with twice the space between lines. This infill pattern offers two-dimensional strength while remaining somewhat firm. The grid pattern uses an average amount of filament and takes a moderate amount of time to complete.
- Triangles: The triangles pattern comprises overlapping triangular lines that run in three directions in the XY plane. This 3D printing infill pattern only provides strength in two dimensions, but it is still suitable for prints that require power.
- Tri-hexagon: The tri-hexagon infill pattern is made up of lines that run in three directions in the XY plane, resulting in hexagonal structures with triangles in between. This 3D printing infill structure gives two-dimensional strength and is suitable for solid prints.
- Cubic: This pattern yields stacked cubes because a 45-degree angle tilts both X and Y axes. They seem to more like triangles at any given time. The pattern provides excellent three-dimensional strength but requires slightly more material and time than others.
- Octet: The octet 3D printing infill pattern is similar to the cubic pattern in that it increases sloped triangles, but it materializes as squares. This infill pattern is a three-dimensional pattern that is visually appealing and functional for parts that require strength.
- Gyroid: The gyroid infill pattern is one of the most visually appealing but strange infill patterns. It has concave irregular curves that eventually cross. Its goal is to achieve the best possible balance of strength, material, and print time.
- Concentric: The concentric infill pattern is an internal structure made up of concentric lines that match the outline of a part (i.e., its perimeters). This pattern is easy to print, suitable for flexible parts, and uses far less material than most patterns.
RECOMMENDED 3D PRINT INFILL PATTERN SETTINGS
Standard: Grid or triangles
Functional: Cubic, gyroid, or octet
Figurine and model: Lines
Flexible: Concentric
Other Considerations
Aside from pattern and density, two other notable categories of infill settings are variable settings and art patterns. Both let you be more creative with your 3D printing infill settings. Each is described in detail below.
Variable Settings
These settings allow you to change the density of the 3D printing infill as the part progresses through the layers. Variable settings, for example, allow you to have a 10 percent infill on a part’s base until layer 30 and then switch to a 50 percent 3D printing infill.
Here are some resources to help you do this in Simplify3D, PrusaSlicer, or Cura:
Simplify3D: Simplify3D makes it simple to change the infill settings. They show how to change settings at different sections of a model to learn how to do it correctly.
PrusaSlicer: It is possible to change the variable settings, but it is a little more difficult. Some subscribers have clarified how to do it in PrusaSlicer, and you can find out more about it on the PrusaPrinters forum page and in their print tips archive.
Cura: There isn’t much information available about this process, but it includes support blockers to change infill densities. How to do this can be found on Ultimaker’s forum and Reddit.
Art Infill
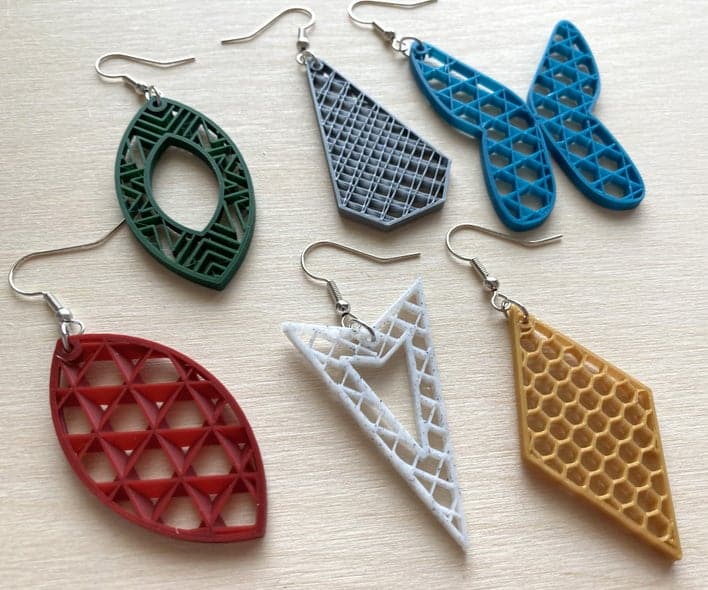
3D printing infill for art is a technique for transforming various infill patterns into works of art. Earrings, pendants, and other jewelry and art pieces look fantastic after this process.
Remove the top and bottom layers to expose the infill patterns to make this process work. You should read one of the many guides to this procedure.
Featured Image Source: https://www.3dhubs.com/


